Python
Table of Contents
1. book
2. language
2.1. philosophy
>>> import this The Zen of Python, by Tim Peters
Beautiful is better than ugly. Explicit is better than implicit. Simple is better than complex. Complex is better than complicated. Flat is better than nested. Sparse is better than dense. Readability counts. Special cases aren't special enough to break the rules. Although practicality beats purity. Errors should never pass silently. Unless explicitly silenced. In the face of ambiguity, refuse the temptation to guess. There should be one– and preferably only one –obvious way to do it. Although that way may not be obvious at first unless you're Dutch. Now is better than never. Although never is often better than right now. If the implementation is hard to explain, it's a bad idea. If the implementation is easy to explain, it may be a good idea. Namespaces are one honking great idea – let's do more of those!
2.2. 基础知识(basic concepts)
- str vs. repr # str是字符串表示,repr是code-form.
- a is b # 判断是否为同一对象
- copy.copy/deepcopy # 来做对象拷贝/深拷贝
- r'…' # raw-string. 对字符串不做任何转义
- except (E1, E2, …) as e # 捕获多种类型异常
- PYTHONPATH环境变量可以控制模块搜索路径
- __init.py__ 文件中变量__all__(列表)可以控制"from X import *"导入的名字
2.3. 命名惯例(name convention)
- 以单一下划线开头的变量名( _X )不会被from module import *语句导入
- 前后有两个下划线的变量名( X )是系统定义的变量名,对解释器有特殊意义
- 以两下划线开头,但是结尾没有两个下划线的变量名(__X)是类的私有变量
- 通过交互模式运行,只有单个下划线的变量名(_)会保存左后表达式的结果
2.4. 字符编码(encoding)
python字符串是unicode类型,二进制是str类型。
- encode是将unicode转换成为str
- decode是将str转换成为unicode
>>> a="中国"
>>> a
'\xe4\xb8\xad\xe5\x9b\xbd'
>>> a.decode('utf8')
u'\u4e2d\u56fd'
>>> print a.decode('utf8')
中国
>>> print a.decode('gb18030')
涓浗
这里一个比较难处理的问题就是字符编码的识别,现在处理的办法就是尝试全部转换成为utf8来进行处理。实现办法就是首先尝试转换到gb18030, 如果转换失败的话那么转换成为utf8(当然这不是最好的,使用chardet这样的模块似乎是更合理的选择),这样的操作对于我们中国大陆用户来说基本上应该OK。就我所知道的系统XP都是GB2312编码,linux/mac通常设置成为utf8,而cygwin这样架在windows上面的系统通常也是gb2312。
def toUTF8(s):
    try:
        # detect gb2312 first.
        return s.decode('gb2312').encode('utf8')
    except UnicodeDecodeError,e:
        return s

def toLocal(s):
    try:
        open(s,'r') # what a tricky way.
        return s
    except IOError,e:
        if(e.errno==22): # errno.EINVAL
            return s.decode('utf8').encode('gb2312')
        return s
对于从本地转换出去的话,我们首先尝试使用gb2312进行decode,如果失败的话那么就认为是utf8编码,当然这里会有一定的错误机率(但是不大)。转换到本地的话,我们唯一不确定的就是本地是utf8格式还是gb2312格式。可以通过尝试打开一个文件来判断,其中22是errno.EINVAL的错误编码。如果字符编码错误的话,那么返回的就是invalid argument的错误,同样会存在一定错误机率(但是不大)。出现错误几率的原因就是这些码点,使用gb2312可以正常解释,使用utf8也可以正常解释。
修改饭团系统的时候,使用sqlitedb还出现了字符编码问题。系统似乎默认使用ascii来进行编码解码,可以修改系统默认的编码解码方式为utf8。
import sys
if(sys.getdefaultencoding() !='utf8'):
  reload(sys)
  sys.setdefaultencoding('utf8')
UPDATE@201801: 这个问题只会出现在Python2.x Python3之后默认使用utf8编码了,而且没有 narrow/wide build 问题了。
UPDATE@201801 在decode阶段有个参数 `errors` 可以用来控制错误编码字符
- strict 默认值,直接返回UnicodeError
- ignore 跳过这个字符
- replace 用U+FFFD REPLACEMENT CHARACTER替换这个字符
今天我看 `requests` 代码里面,处理 `Response.text` 对象时使用了这个方法
# Decode unicode from given encoding.
try:
    content = str(self.content, encoding, errors='replace')
except (LookupError, TypeError):
    # A LookupError is raised if the encoding was not found which could
    # indicate a misspelling or similar mistake.
    #
    # A TypeError can be raised if encoding is None
    #
    # So we try blindly encoding.
    content = str(self.content, errors='replace')
2.5. import and reload
- import <module> # 模块只有首次import时候会被执行。模块名字<module>拷贝到本模块。
- from <module> import <name> # 和import过程类似,但是仅仅将模块内部名字<name>拷贝到本模块。
- reload(<module>) # reload是函数而不是语句。之前必须确保模块被import过,reload重新执行模块内容。
#!/usr/bin/env python
#coding:utf-8
#Copyright (C) dirlt

import mod
"""
# mod.py
ls = [1,2,3,4]
ss = 'hello, world'
"""
print mod.ls, mod.ss

# 将ls和ss拷贝进来
from mod import ls as ls1, ss as ss1
mod.ls = []
mod.ss = 'hello, main'
print ls1, ss1 # [1,2,3,4], 'hello, world'

# 重新拷贝一份
from mod import ls as ls1, ss as ss1
print ls1, ss1 # [], 'hello, main'

# 再次拷贝但是重新执行mod
reload(mod)
from mod import ls as ls1, ss as ss1
print ls1, ss1 # [1,2,3,4], 'hello, world'
2.6. list comprehension
iterator可以是字符串,列表,元组,set/dict, 文件等各种迭代器(可迭代对象)
- [(generate x) for x in iterator if (filter x)] # 列表
- {(generate x) for x in iterator if (filter x)} # 集合
- {(gen-key x):(gen-value x) for x in iterator if (filter x)} # 字典
f = open('main.py')
s = [len(x) for x in f if x] # 文件作为迭代器
d = {x:x for x in xrange(0, 10)} # xrange返回迭代器
s = {'%d:%d'%(k, d[k]) for k in d} # 字典作为迭代器
s = {x for x in s} # 集合作为迭代器
2.7. 可变参数和字典参数
可变参数是以*开头标识的参数,字典参数是以**开头标识的参数。可变参数得到的是一个tuple, 而字典参数得到的是一个dict.
def foo(a, b, c, *args, **kwargs):
    print 'a = {}, b = {}, c = {}, args = {}, kwargs = {}'.format(
        a, b, c, args, kwargs)
    if a == 0: return
    foo(a - 1, b, c, *(1, 2, 3), **{'e':1, 'f':2})

foo(2, 4, 5, *(1, 2), **{'x': '??'})
输出结果是
a = 2, b = 4, c = 5, args = (1, 2), kwargs = {'x': '??'}
a = 1, b = 4, c = 5, args = (1, 2, 3), kwargs = {'e': 1, 'f': 2}
a = 0, b = 4, c = 5, args = (1, 2, 3), kwargs = {'e': 1, 'f': 2}
如果要将tuple/dict显式地传递作为可变/字典参数的话,需要在变量开头加上*和**
2.8. generator(生成器)
可以把生成器认为是一个有状态的,具有迭代接口(next)的对象。定义生成器有两种方法,一种是使用list comprehension, 另外一种则是在函数中用yield.
a = [1,2,3,4]
b = (x + 1 for x in a if x % 2 == 0) # list comprehension
print b.next()
print b.next()

def fib():
    a = 0
    b = 1
    while True:
        yield b
        (a, b) = (b, a + b)
f = fib()
for i in range(0, 10):
    print f.next()
函数生成器还可以当做协程来使用。具体地,yield可以有一个返回值。如果调用next()的话,那么返回值是None. send(value)的话那么返回值是value.
def process_request():
    res = None
    while True:
        req = yield res
        res = req + 1

def io_loop():
    pr = process_request()
    pr.send(None)
    # pr.next()
    res = pr.send(10)
    print res
    res = pr.send(20)
    print res

io_loop()
注意如果要使用send的话,必须使用send(None)/next来初始化.
Python3之前如果需要将多个生成器串联起来的话,不是特别容易。代码里面 `bar` 为了将两个 `foo(10)` 和 `foo(20)` 迭代器串联起来,需要显示地遍历。
def foo(n):
    for x in range(3):
        yield x + n


def bar():
    x = foo(10)
    for v in x:
        yield v
    x = foo(20)
    for v in x:
        yield v
    # yield from foo(10)
    # yield from foo(20)


b = bar()
for v in b:
    print(v)
但是Python3引入关键字 `yield from`. 可以简化上面的写法。具体可以看上面这段注释。
2.9. decorator(装饰器)
装饰器是一种设计模式,在原有的对象上或者是函数上,在外部做一些处理。python里面的装饰器是函数,装饰的对象也是函数。
通常装饰器输入参数是一个函数A,输出参数就是装饰过后的A. 当然也可以使用偏函数的方式让装饰器传入自定义参数
#!/usr/bin/env python
#coding:utf-8
#Copyright (C) dirlt

import functools
def foo(f):
    @functools.wraps(f)
    def wrapper(*args, **kwargs):
        print '>>>>>'
        f(*args, **kwargs)
        print '<<<<<'
    return wrapper

def foo2(text):
    def bar(f):
        @functools.wraps(f)
        def wrapper(*args, **kwargs):
            print '>>>>', text
            f(*args, **kwargs)
            print '<<<<<', text
        return wrapper
    return bar

@foo
def func():
    print 'hello, world'

@foo2('????')
def func2():
    print 'hello, world'

func()
func2()
print func.__name__
print func2.__name__
使用functools.wraps这个装饰器是可以继续使用原有函数的名称,除此之外还做了许多其他工作。
>>>>>
hello, world
<<<<<
>>>> ????
hello, world
<<<<< ????
wrapper
wrapper
2.10. 模块加载路径
一些关于模块加载和模块检索路径方面的文章
- https://docs.python.org/3/reference/import.html
- https://leemendelowitz.github.io/blog/how-does-python-find-packages.html site.py这个脚本会修改sys.path来解决内置python的问题
- https://www.codementor.io/sheena/tutorials/python-path-virtualenv-import-for-beginners-du107r3o1
- http://python-notes.curiousefficiency.org/en/latest/python_concepts/import_traps.html
- http://softwareengineering.stackexchange.com/questions/187403/import-module-vs-from-module-import-function/187471
UPDATE@201801: nova项目中我发现 .pth 这种机制在很大程度上可以帮助模块路径配置。不过好像这种机制仅限于CPython,在PyPy或者是Jython下面不行。
2.11. coroutine(协程)
我理解generator和coroutine之间的差别只是在于切换上下文上。generator的切换关系是沿着调用链的,也是是callee完成后必须要返回到caller. 而coroutine则没有这个限制,可以在多个函数之间切换,而这多个函数之间并没有caller/callee的联系。
coroutine之间是可以交换数据的,下面这两个操作是配对的。coroutine的启动需要强制 `c.send(None)`
- `n = yield r`
- `r = c.send(n)`
看下面这段代码
ef consumer():
    print('start consumer')
    r = 'uninitialized'
    while True:
        n = yield r
        if not n:
            return
        print('[CONSUMER] Consuming %s...' % n)
        r = '200 OK'


def produce(c):
    r = c.send(None)
    print(r)
    print('start producer')
    n = 0
    while n < 5:
        n = n + 1
        print('[PRODUCER] Producing %s...' % n)
        r = c.send(n)
        print('[PRODUCER] Consumer return: %s' % r)
    c.close()


c = consumer()
produce(c)
- `r = c.send(None)` 首先启动consumer.
- consumer执行到 `n = yield r` 这个部分,要求外部继续输入并且返回r(uninitialized),切换回producer.
- producer执行到 `r = c.send(1)`, 然后切换到consumer. 后面循环继续
上面这段代码的输出结果如下
start consumer
uninitialized
start producer
[PRODUCER] Producing 1...
[CONSUMER] Consuming 1...
[PRODUCER] Consumer return: 200 OK
[PRODUCER] Producing 2...
[CONSUMER] Consuming 2...
[PRODUCER] Consumer return: 200 OK
[PRODUCER] Producing 3...
[CONSUMER] Consuming 3...
[PRODUCER] Consumer return: 200 OK
[PRODUCER] Producing 4...
[CONSUMER] Consuming 4...
[PRODUCER] Consumer return: 200 OK
[PRODUCER] Producing 5...
[CONSUMER] Consuming 5...
[PRODUCER] Consumer return: 200 OK
3. library
3.1. httplib
关于httplib.HTTPConnection超时问题
- python - HTTP Request Timeout - Stack Overflow : http://stackoverflow.com/questions/265720/http-request-timeout
- 构造函数的timeout是connect timeout. 而不是recv/send timeout. 超时单位是秒.
- send/recv timeout可以通过socket.setdefaulttimeout()来设置,全局设置对所有socket有效.
- 对单个socket可以通过设置connection.sock.settimeout完成,但是必须首先connect才能够获得sock对象.
UPDATE@201802 socket client其实是支持绑定地址的,这个对于多网卡机器非常有用,但是很多lib包括httplib以及requests这类库都不支持。不过python有个好处就是可以很容易地做monkey patch,我们可以直接在socket调用connect之前做地址/端口绑定
from socket import Socket
 _socket_connect = Socket.connect

def my_socket_connect(self: Socket, address):
    # logger.warning('socket {} bind to {}'.format(self, args.bind))
    self.bind((bind_address, 0))
    return _socket_connect(self, address)

Socket.connect = my_socket_connect
3.2. datetime
日期时间和时间戳之间的转化
def dt2ts(s):
    st = time.strptime(s,'%Y-%m-%d %H:%M:%S')
    return int(time.mktime(st))

def ts2dt(ts):
    # in seconds.
    st = time.localtime(int(ts))
    return time.strftime('%Y-%m-%d %H:%M:%S',st)
其中strptime是非常耗时的(12.9us),所以应该尽量避免这种parse的方法。
In [8]: timeit time.strptime('2015-01-02 22:21:01', '%Y-%m-%d %H:%M:%S')
100000 loops, best of 3: 12.9 µs per loop

In [9]: mk = time.strptime('2015-01-02 22:21:01', '%Y-%m-%d %H:%M:%S')

In [10]: timeit time.mktime(mk)
1000000 loops, best of 3: 1.7 µs per loop

In [11]: timeit time.localtime(1421974014)
1000000 loops, best of 3: 1.71 µs per loop

In [12]: st = time.localtime(1421974014)

In [13]: timeit time.strftime('%Y-%m-%d %H:%M:%S', st)
1000000 loops, best of 3: 631 ns per loop
为了加快速度,一个办法是可以自己解析字符串。使用下面这个方法来代替strptime,平均耗时在(4.16us)
def f(s):
    (d,t) = s.split(' ')
    # (yr, mon, dy) = map(lambda x: int(x), d.split('-'))
    # (hr, min, sec) = map(lambda x: int(x), t.split(':'))
    # dt = datetime.datetime(yr, mon, dy, hr, min, sec)
    (yr, mon, dy) = d.split('-')
    (hr, mn, sec) = t.split(':')
    dt = datetime.datetime(int(yr), int(mon), int(dy), int(hr), int(mn), int(sec))
    st = dt.timetuple()
    return st
UPDATE@201802: 解析各种时间格式是非常麻烦的事情,好在有个 `python-dateutil` 库可以来解决这个问题。另外如果需要处理多个时区的话,最好统一转换成为UTC时间来处理。 `python-dateutil` 有时候无法是被某些特定的timezone, 可以通过 `tzinfos` 字段来告诉如何处理
TZINFOS = {'PST': -8 * 3600}

def parse_date(s):
    if not s:
        return None
    try:
        x = dateutil.parser.parse(s, tzinfos=TZINFOS)
        tzinfo = getattr(x, 'tzinfo')
        if tzinfo:
            offset = tzinfo.utcoffset(x)
            y = x - offset
            x = y.replace(tzinfo=None)
        return x
    except Exception:
        logger.exception('parse date %s' % s)
        return None
s = 'Fri, 9 Feb 2018 03:00:00 PST'
parse_date(s)

Out[5]: datetime.datetime(2018, 2, 9, 11, 0)
3.3. datetime v2
@2019-04-23T21:51:45
这里在放几个链接作为参考。除了 `python-dateutil` 这个库之外,还有一些库也在致力解决datetime这种世界性的难题
- https://stackoverflow.com/questions/1703546/parsing-date-time-string-with-timezone-abbreviated-name-in-python
- https://opensource.com/article/17/5/understanding-datetime-python-primer
- https://opensource.com/article/18/4/python-datetime-libraries
即便在切换到 `python-dateutil` 这个库之后依然存在一些问题,最主要的问题就是timezone列表不够完整。 现在我发现一个终极武器了,那就是 `python-dateutil` + `pytz`. 后者在timezone方面做的非常好(看名字就知道了) 东拼西凑一把,就可以搞出一个 ultimate parse_date 函数,可以把基础所有的日期字符串全部解析为UTC日期时间对象。
#!/usr/bin/env python
# coding:utf-8
# Copyright (C) dirlt

import datetime
import dateutil
import dateutil.parser
import dateutil.tz
import pytz

def gen_tzinfos():
    now = datetime.datetime.utcnow()
    for zone in pytz.common_timezones:
        try:
            tzdate = pytz.timezone(zone).localize(now)
        except pytz.NonExistentTimeError:
            pass
        else:
            tzinfo = dateutil.tz.gettz(zone)
            if tzinfo:
                yield tzdate.tzname(), tzinfo


TZINFOS = dict(gen_tzinfos())


def parse_date(s):
    x = dateutil.parser.parse(s, tzinfos=TZINFOS, fuzzy=True)
    tzinfo = getattr(x, 'tzinfo')
    if tzinfo:
        offset = tzinfo.utcoffset(x)
        y = x - offset
        x = y.replace(tzinfo=None)
    return x
3.4. pip
python模块管理工具(python package index)
可以使用pip单独安装某个模块,也可以通过描述文件(requirements.txt)来安装一系列模块(对于setup environment非常有用)
- pip freeze # 以requirements.txt格式,输出本地所有安装的python模块
- pip install -r requirements.txt –download= `pwd` /pycache # 安装python模块并且将下载文件缓存起来
- pip install –no-index –find-links=file:// `pwd` /pycache -r requirements.txt # 从缓存目录安装python模块
- pip wheel -r requirements.txt –wheel-dir= `pwd` pywheel –find-links=file:/ `pwd` /pycache # 将python模块编译称为wheel格式(二进制格式,利于分发安装)
- pip install –no-index –find-links=file:// `pwd` /pywheel -r requirements.txt # 从缓存目录安装python模块 (note: 发现有些依赖却没有安装,所以推荐下面一种方式)
- pip install –force-reinstall –ignore-installed –upgrade –no-index –no-deps `pwd` /pywheel/*.whl # 安装所有列举的python模块
3.5. logging
python logging主要有下面几个类
- Loggers expose the interface that application code directly uses.
- Handlers send the log records (created by loggers) to the appropriate destination.
- Filters provide a finer grained facility for determining which log records to output.
- Formatters specify the layout of log records in the final output.
- LogRecord 用来描述单条日志的各种信息
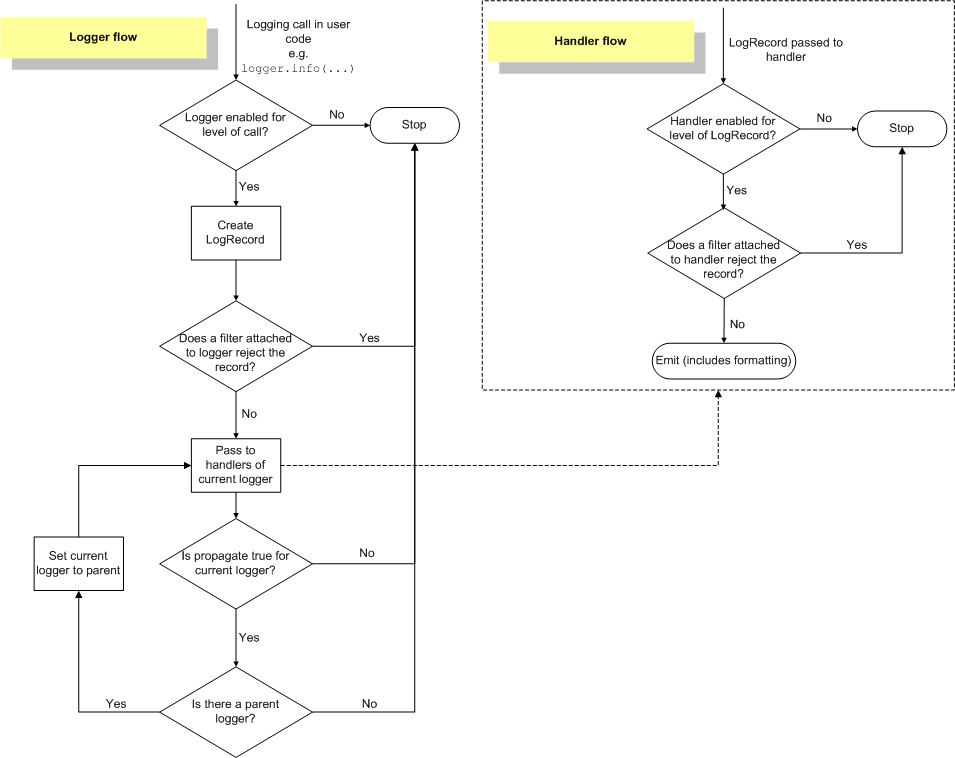
Logger支持层次结构,层次结构是根据name来判断的。比如a就是a.b, a.c, a.d的父logger. 通常来说子logger打印日志都会传递到上层logger(也可以通过disable propagate来关闭), 带来的好处是用户只需要在最上层设置一次handler, format, filter之后,子logger就都可以使用它们而不必单独设置。下图是logging流程
内置的FileHandler只能够正确地处理一个解释器中多个线程向一个文件打印的情况,但是却不能解决多个进程向同一个文件打印。社区有一些Handler实现来解决这个问题比如 multiprocessing-logging 和 ConcurrentLogHandler.
logging配置可以从文件载入 `logging.config.fileConfig('logging.cfg')`
[loggers]
keys = root

[handlers]
keys = h0

[formatters]
keys = f0

[logger_root]
level = DEBUG
handlers = h0

[handler_h0]
level = DEBUG
class = FileHandler
formatter = f0
args = ('svr.log',)

[formatter_f0]
format= [%(asctime)s][%(levelname)s]%(name)s@%(funcName)s: %(msg)s
class=logging.Formatter
3.6. virtualenv
https://virtualenv.pypa.io/en/latest/index.html
用来创建独立的python环境. 原理是将python二进制以及依赖库拷贝(软链接)到独立目录下面. 使用 `pip install virtualenv` 快速安装. 如果没有特殊要求, 使用也非常简单.
- virtualenv <env-path> 创建独立环境的目录
- cd <env-path>; source bin/activate 重写环境变量, 切换到当前独立环境
- 之后可以在<env-path>目录下面开发, 安装以及部署等工作
- 清理环境使用 deactive.
3.7. asyncio
理论上asynco也可以不配合coroutine,不过配合coroutine才能最好地发挥asyncio的性能。Python3.5引入关键字 `async` 和 `await` 让定义coroutine更加简单。
import asyncio


@asyncio.coroutine
def hello(thread_name):
    print('Hello world! (%s)' % thread_name)
    yield from asyncio.sleep(1)
    print('Hello again! (%s)' % thread_name)


async def hello(thread_name):
    print('Hello world! (%s)' % thread_name)
    await asyncio.sleep(1)
    print('Hello again! (%s)' % thread_name)

loop = asyncio.get_event_loop()
tasks = [hello('TA'), hello('TB')]
loop.run_until_complete(asyncio.wait(tasks))
loop.close()
asyncio里面的event_loop指的就是当前执行线程,所以我们只能往里面添加coroutine,否则一个阻塞操作会使得整个线程挂起,这样其他coroutines就没有办法执行了。 但是在很多情况下,我们使用的库函数本身就不是async/coroutine的,在这种情况下面,我们就需要把这些操作丢到另外一个thread pool下面执行。
import asyncio

import requests


async def test():
    evloop = asyncio.get_event_loop()
    # 对于block的操作需要放到executor里面
    future1 = evloop.run_in_executor(None, requests.get, 'http://baidu.com')
    future2 = evloop.run_in_executor(None, requests.get, 'http://sina.com')
    resp1 = await future1
    resp2 = await future2
    print('baidu.com ...')
    print(resp1.text[:10])
    print('sina.com ...')
    print(resp2.text[:10])


loop = asyncio.get_event_loop()
loop.run_until_complete(test())