Nand2Tetris 计算机系统要素 软件篇
Table of Contents
这个部分内容涉及到汇编器,编译器,操作系统。有几个地方因为以前没有接触过,所以实现起来比较有意思。
1. 汇编器符号解析
汇编器代码比较简单直接,基本上都是一条汇编指令对应一条机器指令,可能稍微有点难度的就是符合解析。
因为汇编代码里面的符号是不用提前声明的,所以符合解析需要使用额外的一遍遍历,找到符号对应的地址。
Hack符号有两类:1. 地址符号 2. 变量符号。在Hack实现里面,地址符号通过 `(label)` 方式声明,如果不是地址符号就是变量符号。 但是如果我们链接的时候,某个地址符号找不到的话,那么就会跳转到变量符号,出现执行错误。如何发现这类错误呢?
一个办法是,通常地址符号后面跟着 JMP 指令。所以可以假设,如果JMP指令之前的指令不是地址符号的话,那么很可能就是找不到符号。 这个问题在 homework 09 的时候,如果没有把 OS 代码放进来的话,那么在产生 asm 文件的时候就会出现问题。
def build_var_symtable(self):
    offset = 16
    for (i,inst) in enumerate(self.insts):
        if isinstance(inst, AInst):
            # absolute address or label.
            if isinstance(inst.addr, int) or \
                    inst.addr in self.symtable:
                pass
            else:
                # 如果下面一条是跳转指令的话,那么说明链接错误
                if (i+1) < len(self.insts):
                    inst2 = self.insts[i+1]
                    if isinstance(inst2, CInst) and inst2.jump is not None:
                        print('[WARNING] jump inst follows non-address label. {} -> {}'.format(
                            inst, inst2))
                if self.debug:
                    print('var {} -> {}'.format(inst.addr, offset))
                self.symtable[inst.addr] = offset
                offset += 1
不过这种检测方式,很大程度上取决编译器生成的代码。如果编译器把函数调用产生的 boilerplate 代码变换一下,那么这种方式就不管用了。 当然编译器也可以在输出上做些文章,对于地址符号可以增加部分输出,告诉汇编器“这必须是一个地址符号”。
在编译器里面添加特殊标识符,声明这是一个函数符号 `//# :fn`.
 text = f"""
 // push stack size to R13
 @{stack_size}
 D=A
 @R13
 M=D
 // push jump label to R14
 //# :fn
 @{name}
 D=A
 @R14
 M=D
 // push return label to D
 @{return_label}
 D=A
 {call_push_text}
 ({return_label})
 """

if inst.must_be_fn():
    print('[WARNING] require address label {}'.format(inst))
然后在编译 homework 09 的时候,如果不把OS代码添加进来的话,就会出现下面这样的错误
./asm.py: ./Average/Average.asm -> ./Average/Average.hack
[WARNING] require address label @Sys.init
[WARNING] require address label @String.new
[WARNING] require address label @String.appendChar
[WARNING] require address label @Keyboard.readInt
[WARNING] require address label @Array.new
[WARNING] require address label @Output.printString
[WARNING] require address label @Math.divide
[WARNING] require address label @Output.printInt
2. 编译器压缩代码大小-优化运算操作
一条bin-op虚拟机指令可能对应到好几条机器指令。比如下面 `add` 指令,大约14条机器指令。
// L55: add
@SP
AM=M-1
D=M
@R13
M=D
@SP
AM=M-1
D=M
@R13
D=D+M
@SP
AM=M+1
A=A-1
M=D
而类似 `gt`, `lt` 这样的指令,则对应更多的机器指令,因为里面还涉及跳转。
// L296: gt
@SP
AM=M-1
D=M
@R13
M=D
@SP
AM=M-1
D=M
@R13
D=D-M
@Math.sqrt$lbl0.true
D;JGT
D=0
@Math.sqrt$lbl0.ok
0;JMP
(Math.sqrt$lbl0.true)
D=-1
(Math.sqrt$lbl0.ok)
@SP
AM=M+1
A=A-1
M=D
如果直接翻译代码的话,09/Square产生的汇编代码没有办法装载进入ROM,所以我们需要对代码进行压缩。
观察这些op代码的话,都是模板代码,没有涉及太多参数。所以我们可以将这些模板代码做成类似函数的形式来调用, 差别就是不用保存太多的上下文,只需要记录一下返回地址就行。我们将返回地址存储在R14里面,然后跳转到具体op代码上。
if ctx.compact_size:
    return_label = ctx.gen_label()
    jump_label = 'ARITH_OP_{}'.format(op.upper())
    text = f"""
    @{return_label}
    D=A
    @R14
    M=D
    @{jump_label}
    0;JMP
    ({return_label})
    """
    return text_to_codes(text)
生成的代码如下,模板代码只需要生成一份,而原来 `add` 代码则只需要6条指令。而且基本上其他运算操作符也就是6条指令。
// L98: add
@Main.main$lbl42
D=A
@R14
M=D
@ARITH_OP_ADD
0;JMP
(Main.main$lbl42)

// ==============================
// ADD模板代码
(ARITH_OP_ADD)
@SP
AM=M-1
D=M
@R13
M=D
@SP
AM=M-1
D=M
@R13
D=D+M
@SP
AM=M+1
A=A-1
M=D
@R14
A=M
0;JMP
3. 编译器压缩代码大小-优化函数调用
优化函数调用代码和上面非常类似,也是将模板代码抽取出来。
从函数调用返回代码非常简单,因为不涉及任何参数,只需要直接跳转到对应代码就好。
// L27: return
@RETURN_POP_CODE
0;JMP

// ==============================
// 从函数调用返回模板代码
(RETURN_POP_CODE)
@LCL
D=M
@5
A=D-A
D=M
@R14
M=D
@SP
AM=M-1
D=M
@ARG
A=M
M=D
@ARG
D=M+1
@SP
M=D
@LCL
D=M
@R13
AM=D-1
D=M
@THAT
M=D
@R13
AM=M-1
D=M
@THIS
M=D
@R13
AM=M-1
D=M
@ARG
M=D
@R13
AM=M-1
D=M
@LCL
M=D
@R14
A=M
0;JMP
触发函数调用则稍微麻烦一些,因为涉及到部分参数。但是好在参数不是特别多,我们可以
- 堆栈大小stack_size存放在R13
- 函数符号func_label存放在R14
- 返回地址return_label存放在D中,这是因为我们后续第一步就是将D压入堆栈,生存期很短。
// L10: call Math.init 0
@5
D=A
@R13
M=D
//# :fn
@Math.init
D=A
@R14
M=D
@Sys.init$lbl4.ret
D=A
@CALL_PUSH_CODE
0;JMP
(Sys.init$lbl4.ret)

// ==============================
// 触发函数调用模板代码
(CALL_PUSH_CODE)
@SP
AM=M+1
A=A-1
M=D
@LCL
D=M
@SP
AM=M+1
A=A-1
M=D
@ARG
D=M
@SP
AM=M+1
A=A-1
M=D
@THIS
D=M
@SP
AM=M+1
A=A-1
M=D
@THAT
D=M
@SP
AM=M+1
A=A-1
M=D
@SP
D=M
@LCL
M=D
@SP
D=M
@R13
D=D-M
@ARG
M=D
@R14
A=M
0;JMP
@R15
A=M
0;JMP
4. 数学库的乘法,除法和开方实现
这些实现方法都是基于二进制来完成的,很容易用计算机的简单指令实现。
乘法通过shift和add来实现:
function void init() {
    let tt = Array.new(16);
    tt[0] = 1;
    tt[1] = 2;
    tt[2] = 4;
    tt[3] = 8;
    tt[4] = 16;
    tt[5] = 32;
    tt[6] = 64;
    tt[7] = 128;
    tt[8] = 256;
    tt[9] = 512;
    tt[10] = 1024;
    tt[11] = 2048;
    tt[12] = 4096;
    tt[13] = 8192;
    tt[14] = 16384;
    tt[15] = 32768;
}

funcetion int multiply(int x, int y) {
    int sum, shift, i;
    let sum = 0;
    let shift = x;
    let i = 0;
    while (i < 16) {
        if (bit(x, i)) {
            sum = sum + shift;
        }
        i = i + 1;
        shift = shift + shift;
    }
}
除法实现类似于10进制的长除法,只不过除数使用二进制向上试探。其中 `_div2` 这种实现可以减少一次乘法调用,但是需要多一个存储空间。
def _div1(x, y):
    if x < y:
        return 0
    q = _div1(x, 2 * y)
    q2 = q * 2
    qy2 = q2 * y
    if (x - qy2) < y:
        pass
    else:
        q2 += 1
    return q2


def _div2(x, y):
    if x < y:
        return 0, 0
    q, qy2 = _div2(x, 2 * y)
    q2 = q * 2
    # qy2 = q * 2 * y = q2 * y
    if (x - qy2) < y:
        pass
    else:
        q2 += 1
        # 如果这里q2 += 1的话,那qy2需要+y
        qy2 += y
    return q2, qy2


def div(x, y):
    q1 = _div1(x, y)
    q2, _ = _div2(x, y)
    assert q1 == q2
    return q2
开方实现则是通过二分法来实现的
def sqrt(x):
    v = 0
    for i in reversed(range(32)):
        t = v + (1 << i)
        if (t * t) <= x:
            v = t
    return v
5. 在屏幕上打印字符
Hack计算机的屏幕尺寸是 256(行) * 512(列)。因为Hack是16bit计算机,所以对应到物理内存上, 类似于二维数组 `int16 mm[256][32]`, 然后屏幕映射内存地址从16384开始。
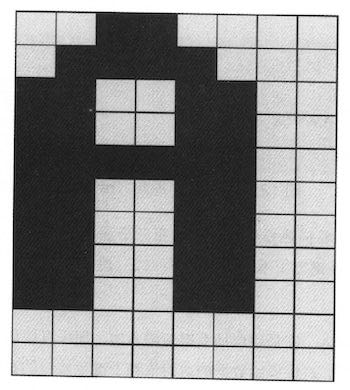
字符可以表示成为位图格式,每个位图的大小是11 x 8,这样来看字符屏幕尺寸则对应为 (256 / 11) x (512 / 8) = 23 x 64. 这样每个字符都可以表示成为11个int value,比如下面A字符可以对应成为(12,30,51,51,63,51,51,51,51,0,0).
展示字符也不是特别麻烦的事情。比较奇怪的是,col=0按照我的理解,应该对应的是16 bits的high 8 bits,但是如果按照这个思路, 相邻字符都会颠倒过来。
/** Displays the given character at the cursor location,
 *  and advances the cursor one column forward. */
function void printCharNow(char ch) {
    var int i,r,c,hl,v,oldv,rc;
    var Array map;
    let r = row * 352;
    let c = col / 2;
    let hl = (col - (c + c));
    let i = 0;
    let rc = r + c;
    let map = Output.getMap(ch);

    // strange!
    // col=1 w.r.t to high bits.
    // col=0 w.r.t to low bits.
    if (hl = 1) { // high bit
        while (i < 11) {
            let v = map[i];
            let oldv = screen[rc];
            let screen[rc] = Output.lshift8(v) | (oldv & 255);
            let i = i + 1;
            let rc = rc + 32;
        }
    } else {
        while (i < 11) {
            let v = map[i];
            let oldv = screen[rc];
            let screen[rc] = (oldv & (-256)) | v;
            let i = i + 1;
            let rc = rc + 32;
        }
    }
    return;
}
6. 优化绘制矩形-连续内存绘制
Hack计算机的屏幕尺寸是 256(行) * 512(列)。因为Hack是16bit计算机,所以对应到物理内存上, 类似于二维数组 `int16 mm[256][32]`, 然后屏幕映射内存地址从16384开始。
一个比较简单直接的办法就是,按照每个pixel填充
/** Draws the (x,y) pixel, using the current color. */
function void drawPixel(int x, int y) {
    var int c, sft, off;
    let c = Screen.div16(x);
    // let sft = x - Screen.mul16(c);
    let sft = (x & 15);
    let off = Screen.mul32(y) + c;
    if (color) {
        let screen[off] = (screen[off] | tt[sft]);
    } else {
        let screen[off] = (screen[off] & (~ tt[sft]));
    }
    return;
}

/** Draws a filled rectangle whose top left corner is (x1, y1)
 * and bottom right corner is (x2,y2), using the current color. */
function void drawRectangle2(int x1, int y1, int x2, int y2) {
    var int x,y;
    let y = y1;
    while(~(y > y2)) {
        let x = x1;
        while(~(x > x2)) {
            do Screen.drawPixel(x, y);
            let x = x + 1;
        }
        let y = y + 1;
    }
    return;
}
但是如果x1,x2如果是和16对齐的话,那么完全可以直接将内存设置成为0或者是-1, 而对于非对齐的则还是退化成为按照pixel来绘制。 而对于非对齐部分,我们还可以直接去填充值,进一步做优化。
 function void drawPixelsIn16Bits(int x1, int x2, int y) {
    var int off, c, sft, x;
    let c = Screen.div16(x1);
    let off = Screen.mul32(y) + c;
    let sft = x1 & 15;
    // let sft = x1 - Screen.mul16(c);
    let x = x1;
    if (color) {
        while(~(x > x2)) {
            let screen[off] = (screen[off] | tt[sft]);
            let sft = sft + 1;
            let x = x + 1;
        }
    } else {
        while(~(x > x2)) {
            let screen[off] = (screen[off] & (~ tt[sft]));
            let sft = sft + 1;
            let x = x + 1;
        }
    }
    return;
}

 function void drawRectangle(int x1, int y1, int x2, int y2) {
     var int x,y,fill,c,off,off2,sft;
     var int c1, c2, x1e, x2e;
     let c1 = Screen.div16((x1 + 15));
     let c2 = Screen.div16(x2);
     let x1e = Screen.mul16(c1);
     let x2e = Screen.mul16(c2);

     if (c1 > c2) {
         let y = y1;
         while (~(y > y2)) {
             do Screen.drawPixelsIn16Bits(x1, x2, y);
             let y = y + 1;
         }
         return;
     }

     let fill = 0;
     if (color) {
        let fill = ~fill;
     }
     let y = y1;
     let off = Screen.mul32(y) + c1;
     while (~(y > y2)) {
         // edge
         // c1 (x1 to x1e-1) low bits
         // c2 (x2e to x2) high bits
         do Screen.drawPixelsIn16Bits(x1, x1e-1, y);
         do Screen.drawPixelsIn16Bits(x2e, x2, y);

         // block.
         let off2 = off;
         let c = c1;
         while(c < c2) {
             let screen[off2] = fill;
             let c = c + 1;
             let off2 = off2 + 1;
         }
         let off = off + 32;
         let y = y + 1;
     }
     return;
 }
7. 优化绘制矩形-优化乘除法
在绘制矩形上,有4个数学运算是最频繁的
- mul16. x * 16
- mul32. x * 32
- div16. x / 16
- mod16. x % 16
其中mul16, mul32可以通过多次叠加来完成,mod16可以通过 (x & 15) 来完成,而div16则可以通过移位来实现。
// tt[i] = (1 << i).
    function int div16(int x) {
        var int sum, i;
        while (i < 12) {
            if (x & tt[i+4]) {
                let sum = sum + tt[i];
            }
            let i = i + 1;
        }
    }
然后我们还可以将循环展开来进一步减少开销。做到这一步,09/Pong的刷新速度就可以接受了。
function int div16(int x) {
    var int sum, i;
    // while (i < 12) {
    //     if (x & tt[i+4]) {
    //         let sum = sum + tt[i];
    //     }
    //     let i = i + 1;
    // }

    if (x & tt[4]) { let sum = sum + tt[0]; }
    if (x & tt[5]) { let sum = sum + tt[1]; }
    if (x & tt[6]) { let sum = sum + tt[2]; }
    if (x & tt[7]) { let sum = sum + tt[3]; }
    if (x & tt[8]) { let sum = sum + tt[4]; }
    if (x & tt[9]) { let sum = sum + tt[5]; }
    if (x & tt[10]) { let sum = sum + tt[6]; }
    if (x & tt[11]) { let sum = sum + tt[7]; }
    if (x & tt[12]) { let sum = sum + tt[8]; }
    if (x & tt[13]) { let sum = sum + tt[9]; }
    if (x & tt[14]) { let sum = sum + tt[10]; }
    if (x & tt[15]) { let sum = sum + tt[11]; }
    return sum;
}