Making Photos Smaller Without Quality Loss
https://engineeringblog.yelp.com/2017/06/making-photos-smaller.html
不降低图像质量情况下将大小减少30%
原始代码如下. 指定hw,保存格式,以及图片质量85.
# do a typical thumbnail, preserving aspect ratio
new_photo = photo.copy()
new_photo.thumbnail(
    (width, height),
    resample=PIL.Image.ANTIALIAS,
)
thumbfile = cStringIO.StringIO()
save_args = {'format': format}
if format == 'JPEG':
    save_args['quality'] = 85
new_photo.save(thumbfile, **save_args)
最先想到的解决办法是依赖于 CDN 来完成图像压缩,但是这类压缩应该会明显降低质量,所以我们尝试下面几种办法,在不降低质量的前提下,对图像进行压缩。包括下面几种:
- Changes in Pillow
- Optimize flag
- Progressive JPEG
- Changes to application photo logic
- Large PNG detection
- Dynamic JPEG quality
- Changes to JPEG encoder
- Mozjpeg (trellis quantization, custom quantization matrix)
Optimize Flag
在pillow里面使用 `optimize=True` 这个参数,原理和改变gzip的压缩比例类似,尝试各种压缩策略。这个会耗费一些CPU,也可以获得few percent size reduction.
Progressive JPEG
渐进式的图片可以在pillow里面指定 `progressive=True` 这个参数获得。默认的jpeg编码方式是使用zigzag对8x8的block进行编码,然后逐个block展现出来。progressive jpeg编码方式是对这些block重新排序,对于high value的block放在前面,这样可以先将图片轮廓展现出来先,后面在来展现细节。
Large PNG Detection
PNG是完全无损的图片格式,而JPEG可以设置图片质量来做压缩。通常PNG文件都比较大,比较适合展现那种对比度非常高(high contrast)的图片。但是我们发现有一些PNG文件非常大,但是其中细节扭曲是没有办法可见的(small distortions are not visible),针对这类PNG文件可以考虑使用JPEG来做存储。那么如何来界定这些图片呢?(这个非常精彩)
Using an experimental sample of 2,500 images, we found that a combination of file size and unique pixels worked well to detect photos. We generate a candidate thumbnail image at our largest resolution and see if the output PNG file is larger than 300KiB. If it is, we’ll also check the image contents to see if there are over 2^16 unique colors (Yelp converts RGBA image uploads to RGB, but if we didn’t, we would check that too).
如果图片大小>300KB, 并且内容颜色数量小于2^16种的话,可以认为这种图片不是对比度高的,适合使用JPEG来保存。
Dynamic JPEG Quality
动态调整quality这个参数. JPEG quality这个参数对应的是 quantization tables, quality越低,那么quantization table里面的数就越大,这样result里面的value差距就很小,更加容易做压缩。
有两种办法来决定这个quality, 其中bottom-up应该是在每个block上尝试一些quality,但是会做剪枝,而top-down则是很傻地尝试所有quality/quantization table(or binary search).
另外一个问题是,如何判断图片质量没有明显损失。SSIM(structural similarity metric)可以用来做这件事情,然后还有一个python library pyssim. 这个算法运行非常快速,所以可以在上面运行多轮迭代。
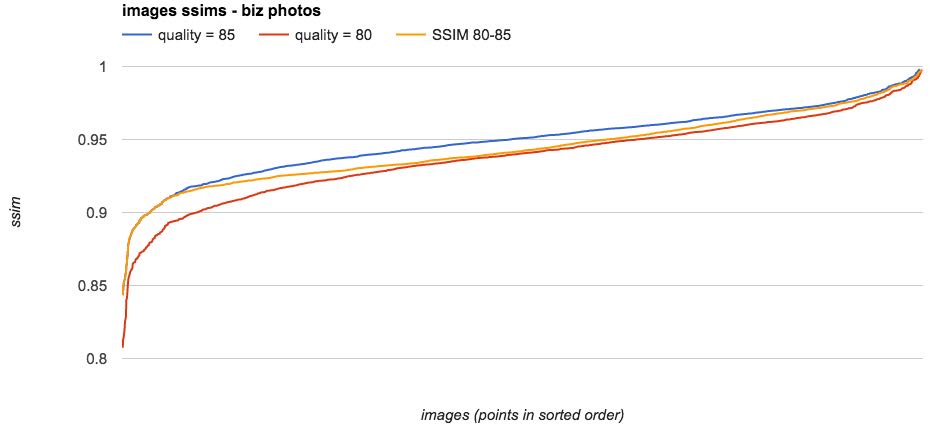
下面算法的大致思路是,用quality = 95做一个base, 得到SSIM-Base, 之后尝试使用二分办法去搜索quality, 每个quality都会有一个SSIM. 如果SSIM/SSIM-Base > 0.95那么就是可以接受的一个quality. 我们先用quality 80和85看了一下SSIM的变化,确定80-85是一个合理的区间。
import cStringIO
import PIL.Image
from ssim import compute_ssim


def get_ssim_at_quality(photo, quality):
    """Return the ssim for this JPEG image saved at the specified quality"""
    ssim_photo = cStringIO.StringIO()
    # optimize is omitted here as it doesn't affect
    # quality but requires additional memory and cpu
    photo.save(ssim_photo, format="JPEG", quality=quality, progressive=True)
    ssim_photo.seek(0)
    ssim_score = compute_ssim(photo, PIL.Image.open(ssim_photo))
    return ssim_score


def _ssim_iteration_count(lo, hi):
    """Return the depth of the binary search tree for this range"""
    if lo >= hi:
        return 0
    else:
        return int(log(hi - lo, 2)) + 1


def jpeg_dynamic_quality(original_photo):
    """Return an integer representing the quality that this JPEG image should be
    saved at to attain the quality threshold specified for this photo class.

    Args:
        original_photo - a prepared PIL JPEG image (only JPEG is supported)
    """
    ssim_goal = 0.95
    hi = 85
    lo = 80

    # working on a smaller size image doesn't give worse results but is faster
    # changing this value requires updating the calculated thresholds
    photo = original_photo.resize((400, 400))

    if not _should_use_dynamic_quality():
        default_ssim = get_ssim_at_quality(photo, hi)
        return hi, default_ssim

    # 95 is the highest useful value for JPEG. Higher values cause different behavior
    # Used to establish the image's intrinsic ssim without encoder artifacts
    normalized_ssim = get_ssim_at_quality(photo, 95)
    selected_quality = selected_ssim = None

    # loop bisection. ssim function increases monotonically so this will converge
    for i in xrange(_ssim_iteration_count(lo, hi)):
        curr_quality = (lo + hi) // 2
        curr_ssim = get_ssim_at_quality(photo, curr_quality)
        ssim_ratio = curr_ssim / normalized_ssim

        if ssim_ratio >= ssim_goal:
            # continue to check whether a lower quality level also exceeds the goal
            selected_quality = curr_quality
            selected_ssim = curr_ssim
            hi = curr_quality
        else:
            lo = curr_quality

    if selected_quality:
        return selected_quality, selected_ssim
    else:
        default_ssim = get_ssim_at_quality(photo, hi)
        return hi, default_ssim
不过这篇 文章 把dynamic quality发挥得更加极致.
Changes to JPEG Encoder
mozjpeg是libjpeg-turbo的fork, 它会尝试更多的策略来尽可能地压缩文件,但是同样会耗费更多的CPU. 其中一个思路是,使用和标准jpeg不同的quantization tables. JPEG Spec里面也提到了其实这是种可行的思路
These tables are provided as examples only and are not necessarily suitable for any particular application.
另外为了使用mozjpeg需要重新编译pillow.
Impact
我们随机选择了2500张图片做测试,每个步骤的压缩比例如下
- Changes to Pillow settings were responsible for about 4.5% of the savings
- Large PNG detection was responsible for about 6.2% of the savings
- Dynamic Quality was responsible for about 4.5% of the savings
- Switching to the mozjpeg encoder was responsible for about 13.8% of the savings
可以看到large png detection和mozjpeg encoder是很有效的,尤其是mozjpeg
What we didn’t do
- Subsampling 下采样,不太清楚这个是怎么搞的
- Lossy PNG encoding. 据说png可以节省72%-85%的空间,
- Dynamic content types. webp以及jpeg2k这些,但是png/jpeg在很长时间还是主流
- SVG. 这个不算是传统意义上的图片格式
- Vendor Magic. 一些在线的 图片服务 和 CDN