linux
Table of Contents
1. vmlinuz
vmlinuz是可引导的、压缩的内核。"vm"代表"Virtual Memory"。Linux 支持虚拟内存,不像老的操作系统比如DOS有640KB内存的限制。Linux能够使用硬盘空间作为虚拟内存,因此得名"vm"。vmlinuz是可执行的Linux内核,它位于/boot/vmlinuz,它一般是一个软链接。vmlinux是未压缩的内核,vmlinuz是vmlinux的压缩文件。
vmlinuz的建立有两种方式。一是编译内核时通过"make zImage"创建,然后通过:"cp /usr/src/linux-2.4/arch/i386/linux/boot/zImage /boot/vmlinuz"产生。zImage适用于小内核的情况,它的存在是为了向后的兼容性。二是内核编译时通过命令make bzImage创建,然后通过:"cp /usr/src/linux-2.4/arch/i386/linux/boot/bzImage /boot/vmlinuz"产生。bzImage是压缩的内核映像,需要注意,bzImage不是用bzip2压缩的,bzImage中的bz容易引起误解,bz表示"big zImage"。 bzImage中的b是"big"意思。
zImage(vmlinuz)和bzImage(vmlinuz)都是用gzip压缩的。它们不仅是一个压缩文件,而且在这两个文件的开头部分内嵌有gzip解压缩代码。所以你不能用gunzip 或 gzip –dc解包vmlinuz。内核文件中包含一个微型的gzip用于解压缩内核并引导它。两者的不同之处在于,老的zImage解压缩内核到低端内存(第一个640K),bzImage解压缩内核到高端内存(1M以上)。如果内核比较小,那么可以采用zImage或bzImage之一,两种方式引导的系统运行时是相同的。大的内核采用bzImage,不能采用zImage。
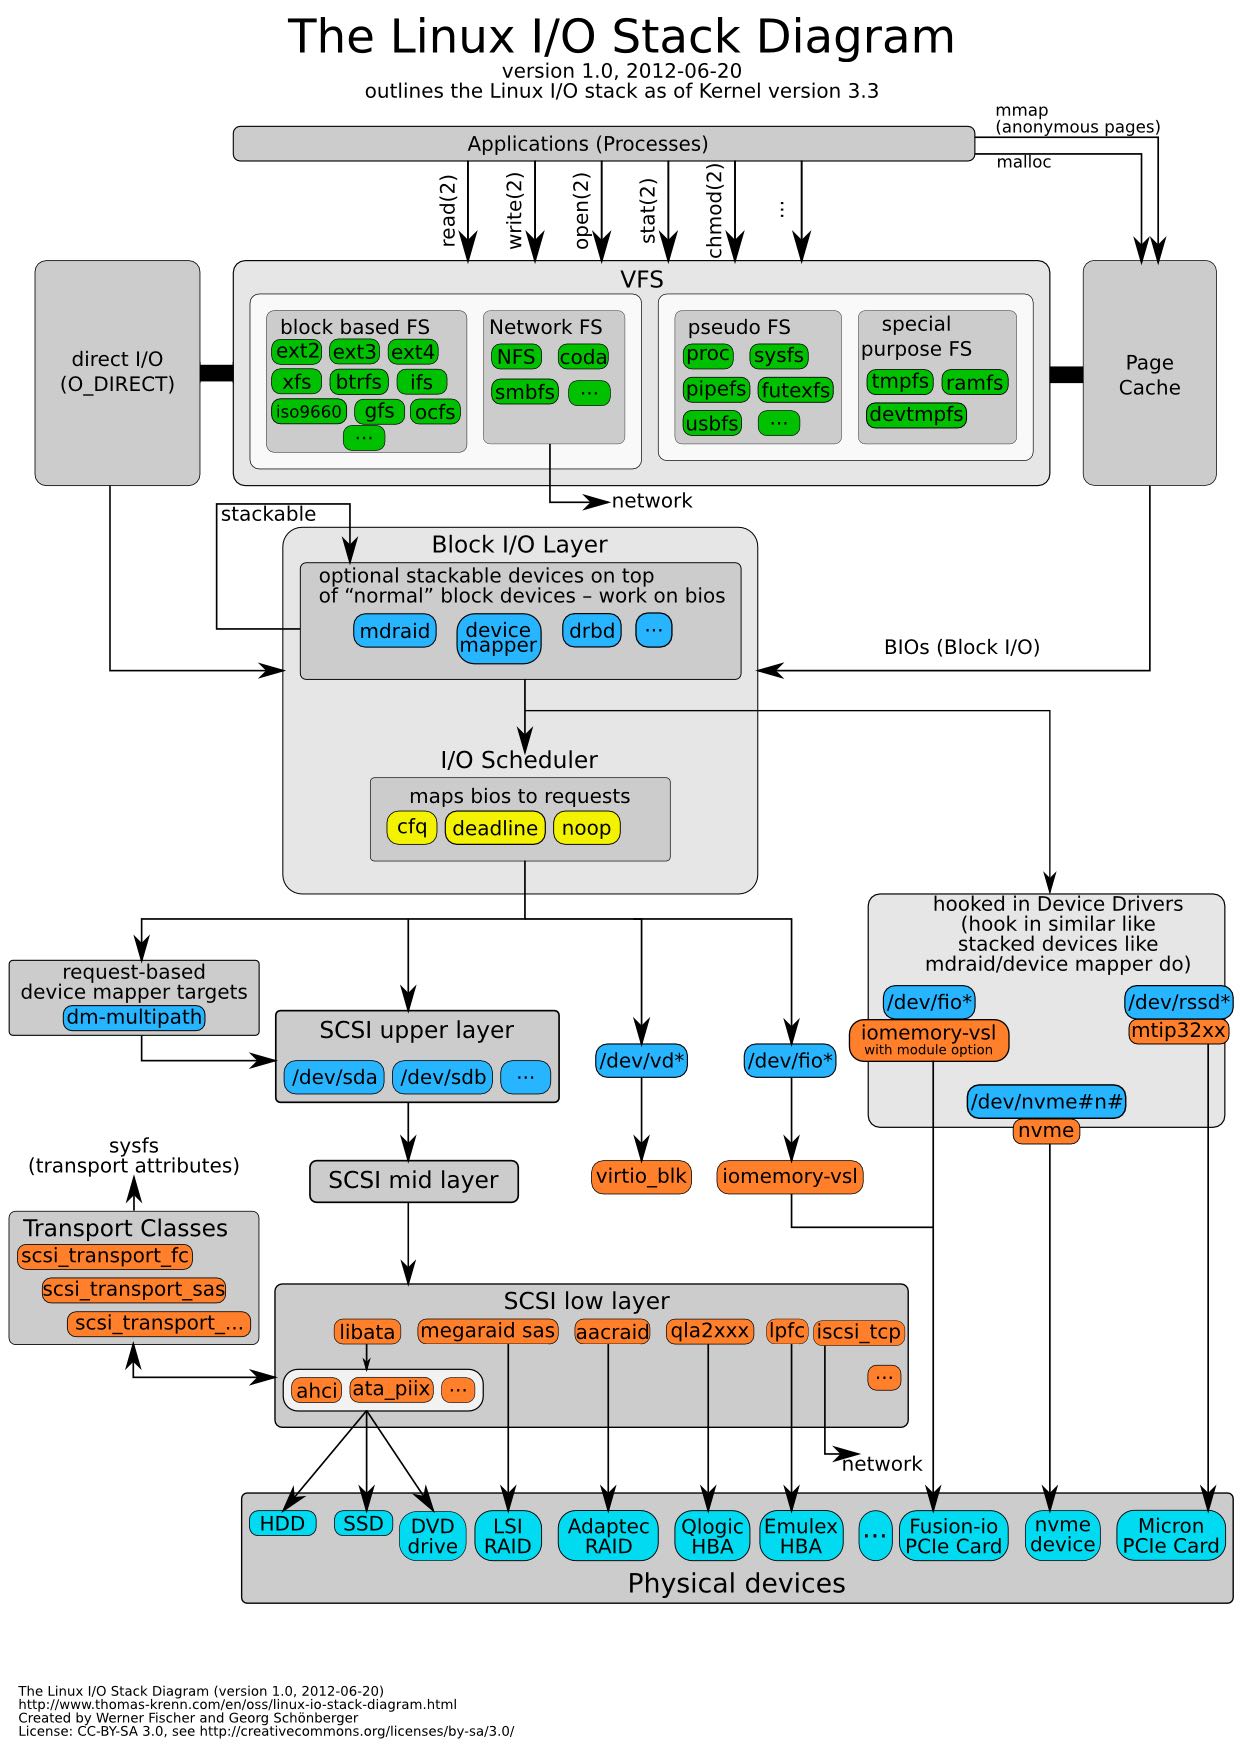
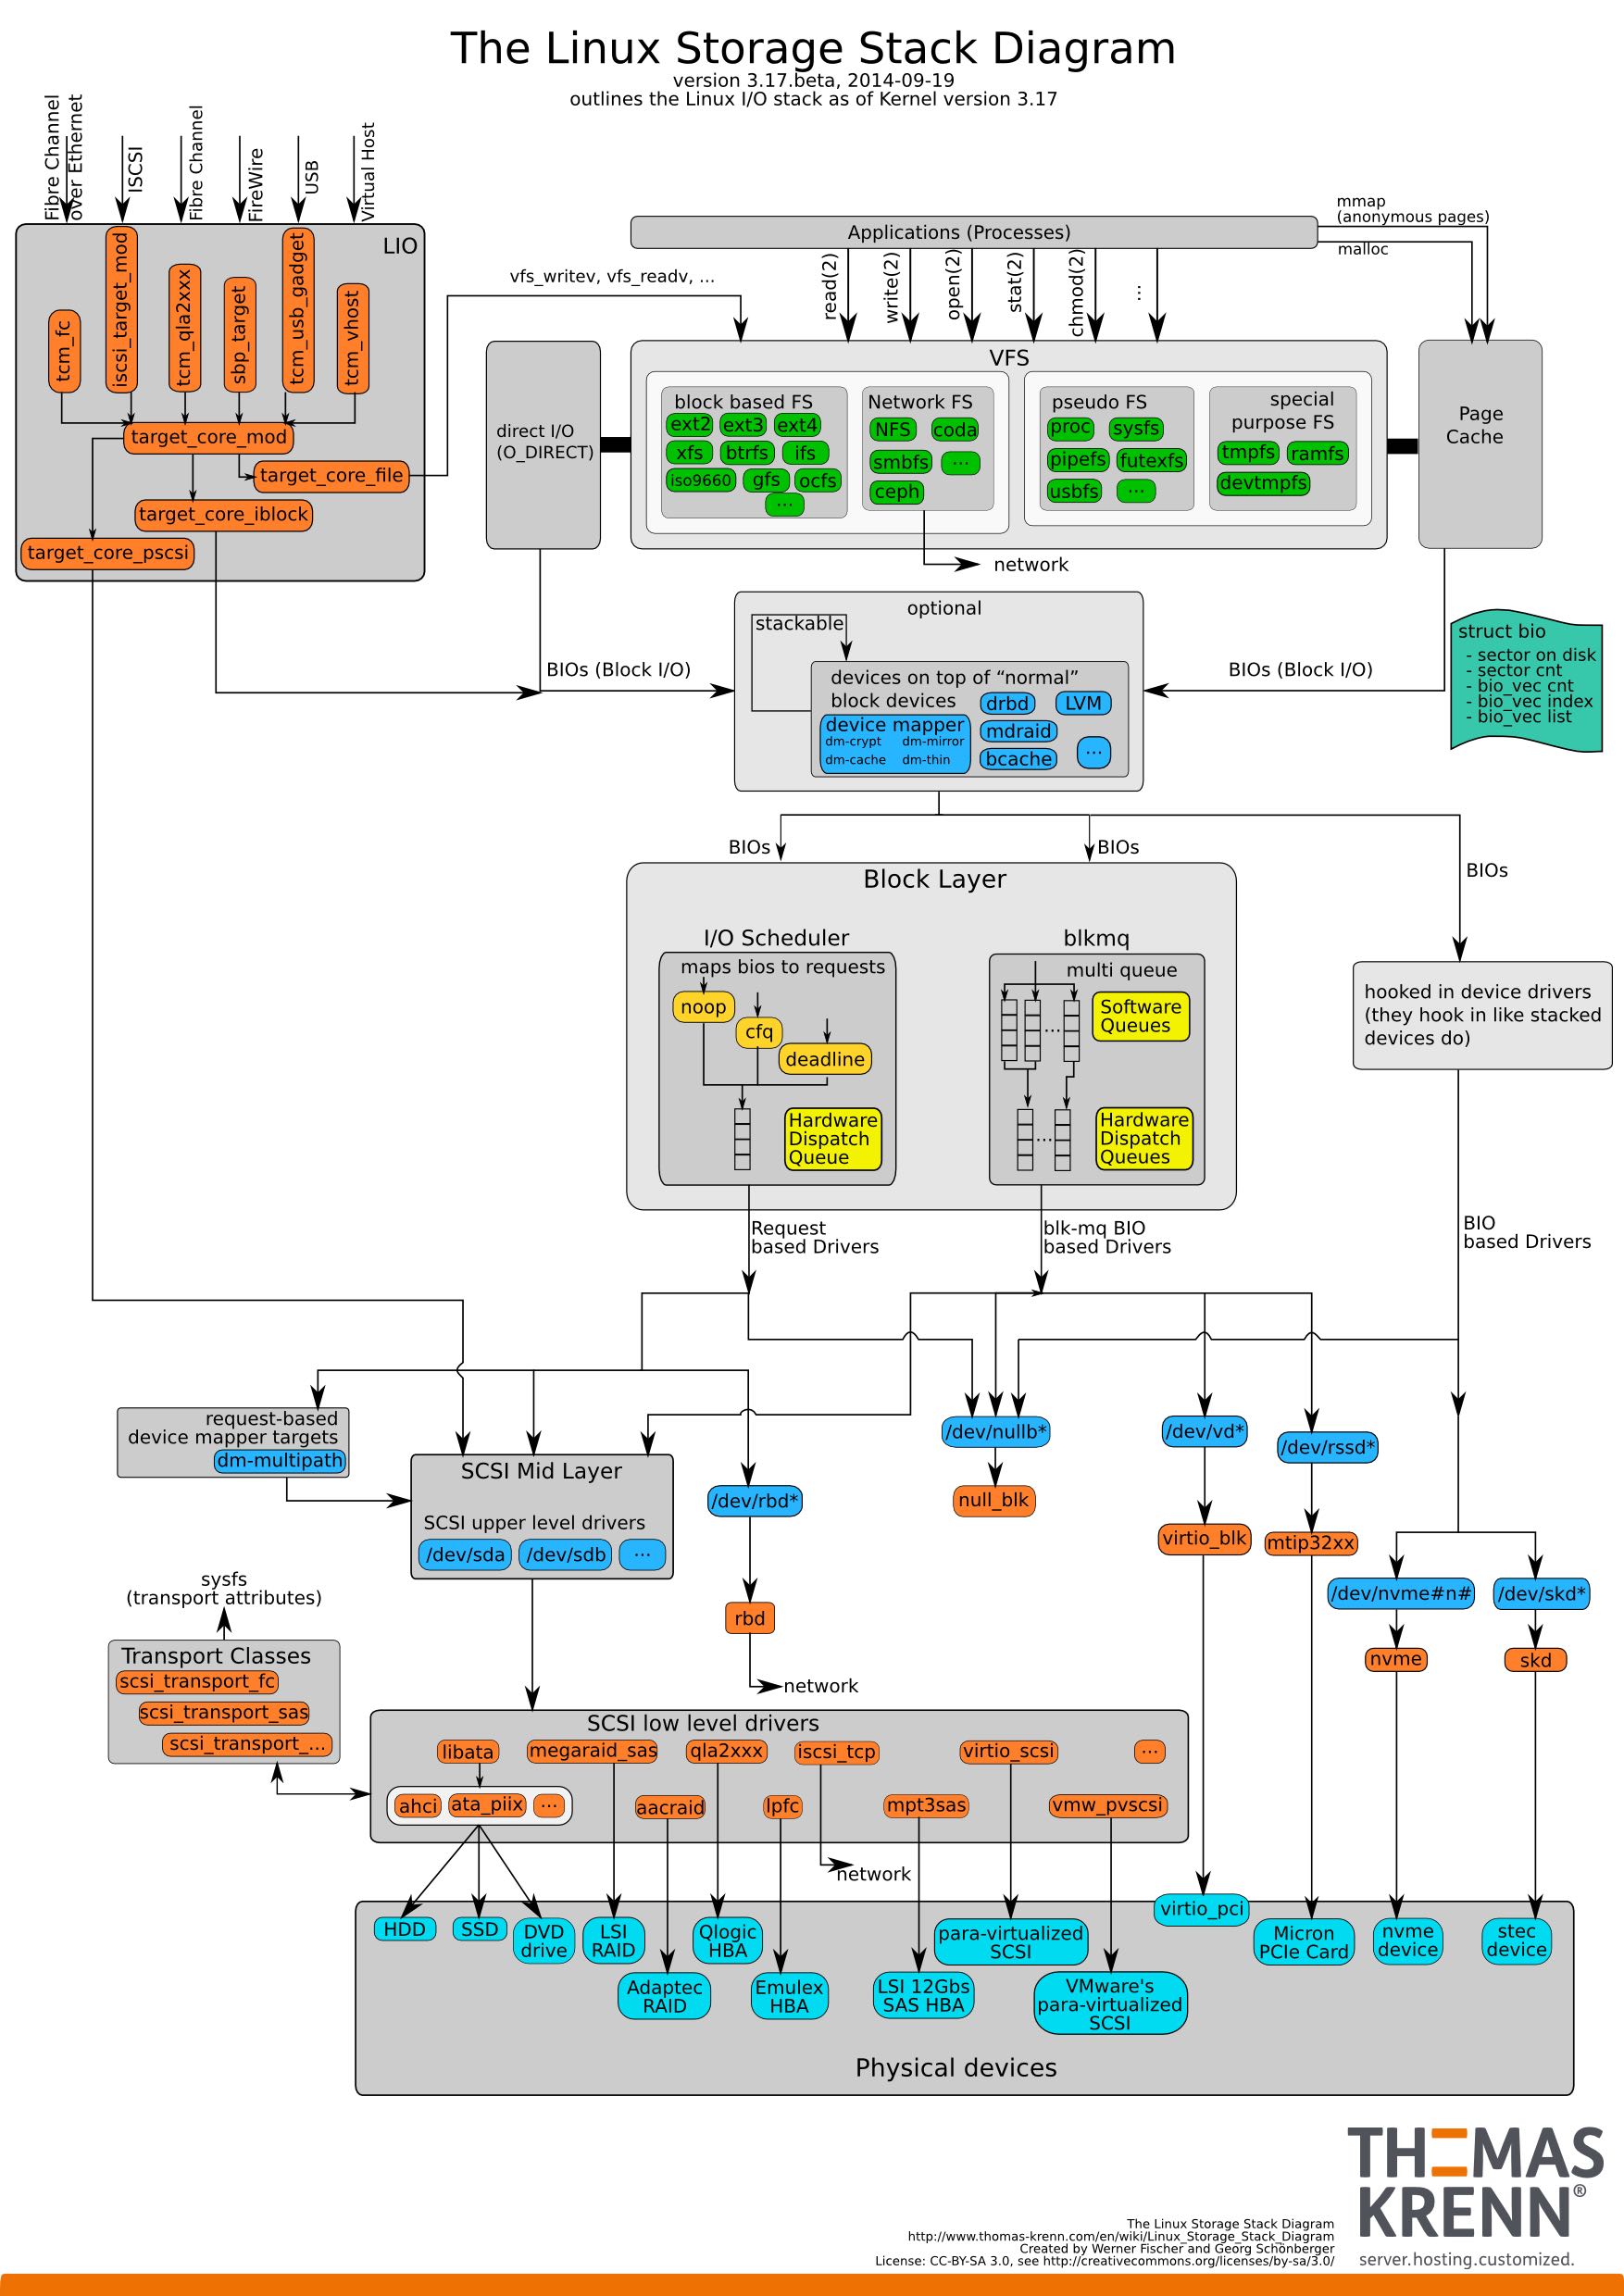
2. linux io/storage stack


3. program exit code
首先看下面一段Java程序
/* coding:utf-8
 * Copyright (C) dirlt
 */

public class X{
  public static void main(String[] args) {
    System.exit(1);
  }
}
然后这个Java程序被Python调用,判断这个打印值
#!/usr/bin/env python
#coding:utf-8
#Copyright (C) dirlt

import os
print os.system('java X')
返回值不为1而是256,对此解释是这样的
a 16-bit number, whose low byte is the signal number that killed the process, and whose high byte is the exit status (if the signal number is zero); the high bit of the low byte is set if a core file was produced.
但是下面这段Python程序,使用echo $?判断返回值为0而不是256
#!/usr/bin/env python
#coding:utf-8
#Copyright (C) dirlt

code=256
exit(code)
4. dp8网卡问题
当时dp8的网络流量从一个非常大的值变为非常小的值,检查/proc/net/netstat,以下几个统计数值dp8和其他机器差距较大(相差1-2个数量级):
- TCPDirectCopyFromPrequeue
- TCPHPHitsToUser
- TCPDSACKUndo
- TCPLossUndo
- TCPLostRetransmit
- TCPFastRetrans
- TCPSlowStartRetrans
- TCPSackShiftFallback
之后在dmesg上面发现如下线索:
dp@dp8:~$ dmesg | grep eth0
[ 15.635160] eth0: Broadcom NetXtreme II BCM5716 1000Base-T (C0) PCI Express f
[ 15.736389] bnx2: eth0: using MSIX
[ 15.738263] ADDRCONF(NETDEV_UP): eth0: link is not ready
[ 37.848755] bnx2: eth0 NIC Copper Link is Up, 100 Mbps full duplex
[ 37.850623] ADDRCONF(NETDEV_CHANGE): eth0: link becomes ready
[ 1933.934668] bnx2: eth0: using MSIX
[ 1933.936960] ADDRCONF(NETDEV_UP): eth0: link is not ready
[ 1956.130773] bnx2: eth0 NIC Copper Link is Up, 100 Mbps full duplex
[ 1956.132625] ADDRCONF(NETDEV_CHANGE): eth0: link becomes ready
[4804526.542976] bnx2: eth0 NIC Copper Link is Down
[4804552.008858] bnx2: eth0 NIC Copper Link is Up, 100 Mbps full duplex
日志 [4804552.008858] bnx2: eth0 NIC Copper Link is Up, 100 Mbps full duplex 表明dp8上的网卡速度被识别成100 Mbps了。
可能的原因如下:
- 网线、水晶头质量太差或老化、水晶头没压好,从而导致网线接触不良或短路等,可以重新压水晶头或更换网线,建议用质量可靠的六类网线六类水晶头
- 本地连接―右键―属性―配置―高级―速度和双工,这里设置错误,改为自动感应或1000Mbps全双工即可
- 网卡所接的交换机或路由器等硬件设备出现故障,或者这些设备是百兆的(千和百连在一起,千变百向下兼容)
- 电磁场干扰有时也会变百兆,所以说网线尽量别与电线一起穿管(论坛会员tchack友情提供)
我们的网线都是由 世xx联 提供的,质量应该不错,有两种情况需要优先排除。
- 网线问题(测试方法:换根网线试试)
- 交换机dp8连接的口坏了(测试方法:把dp8的网线换一个交换机的口)
5. 修改资源限制
临时的修改方式可以通过ulimit来进行修改,也可以通过修改文件/etc/security/limits.conf来永久修改
hadoop - nofile 102400
hadoop - nproc 40960
6. CPU温度过高
这个问题是我在Ubuntu PC上面遇到的,明显的感觉就是运行速度变慢。然后在syslog里面出现如下日志:
May  2 18:24:21 umeng-ubuntu-pc kernel: [ 1188.717609] CPU1: Core temperature/speed normal
May  2 18:24:21 umeng-ubuntu-pc kernel: [ 1188.717612] CPU0: Package temperature above threshold, cpu clock throttled (total events = 137902)
May  2 18:24:21 umeng-ubuntu-pc kernel: [ 1188.717615] CPU2: Package temperature above threshold, cpu clock throttled (total events = 137902)
May  2 18:24:21 umeng-ubuntu-pc kernel: [ 1188.717619] CPU1: Package temperature above threshold, cpu clock throttled (total events = 137902)
May  2 18:24:21 umeng-ubuntu-pc kernel: [ 1188.717622] CPU3: Package temperature above threshold, cpu clock throttled (total events = 137902)
7. sync hangup
- kill -KILL fails to kill process : http://lists.freebsd.org/pipermail/freebsd-questions/2008-September/182821.html
- Linux-Kernel Archive: Bug: sync's hangup forever in call_rwsem_down_read_failed : http://lkml.indiana.edu/hypermail/linux/kernel/1011.2/04099.html
8. upgrade glibc
linux - How to recover after deleting the symbolic link libc.so.6? - Stack Overflow : http://stackoverflow.com/questions/12249547/how-to-recover-after-deleting-the-symbolic-link-libc-so-6
@2013-05-23 https://docs.google.com/a/umeng.com/document/d/12dzJ3OhVlrEax3yIdz0k08F8tM8DDQva1wdrD3K49PI/edit 怀疑glibc版本存在问题,在dp45上操作但是出现问题。
我的操作顺序计划是这样的:
- 将dp20的glibc copy到自己的目录下面/home/dp/dirlt/libc-2.11.so
- 将dp45的glibc backup. mv /lib64/libc-2.12.so /lib64/libc-2.12.bak.so(补充一点,就是在lib64下面还有软链接 libc.so.6 -> libc-2.12.so,这个文件应该是被程序查找使用的)
- cp /home/dp/dirlt/libc-2.11.so /lib64/libc-2.12.so
但是进行到2之后就发现cp不可用了,并且ls等命令也不能够使用了。原因非常简单,就是因为2之后libc.so.6没有对应的文件了,而cp,ls这些基本的命令依赖于这个动态链接库。
~ $ ldd /bin/cp
	linux-vdso.so.1 =>  (0x00007fff9717f000)
	libselinux.so.1 => /lib/x86_64-linux-gnu/libselinux.so.1 (0x00007f5efb804000)
	librt.so.1 => /lib/x86_64-linux-gnu/librt.so.1 (0x00007f5efb5fc000)
	libacl.so.1 => /lib/x86_64-linux-gnu/libacl.so.1 (0x00007f5efb3f3000)
	libattr.so.1 => /lib/x86_64-linux-gnu/libattr.so.1 (0x00007f5efb1ee000)
	libc.so.6 => /lib/x86_64-linux-gnu/libc.so.6 (0x00007f5efae2f000)
	libdl.so.2 => /lib/x86_64-linux-gnu/libdl.so.2 (0x00007f5efac2a000)
	/lib64/ld-linux-x86-64.so.2 (0x00007f5efba2d000)
	libpthread.so.0 => /lib/x86_64-linux-gnu/libpthread.so.0 (0x00007f5efaa0d000)
@2013-08-03
A copy of the C library was found in an unexpected directory | Blog : http://blog.i-al.net/2013/03/a-copy-of-the-c-library-was-found-in-an-unexpected-directory/
上面的链接给出了升级glibc的方法
- sudo su - root # 首先切换到root账号下面
- mv libc.so librt.so /root # 将glibc等相关的so移动到root账号下面,主要不要移动软连接文件。
- LD_PRELOAD=/root/libc.so:/root/librt.so bash # 这个时候如果执行bash是找不到glibc等so了,所以需要使用LD_PRELOAD来预先加载
- apt-get install # 在这个bash下面使用apt-get来安装和升级glibc.
9. 允许不在tty上执行sudo
修改/etc/sudoers文件,注释掉
Defaults requiretty
10. ssh proxy
http://serverfault.com/questions/37629/how-do-i-do-multihop-scp-transfers
- 目的机器是D,端口是16021,用户是x
- 跳板机器是T,端口是18021,用户是y
- client需要和x@D以及y@T建立信任关系
- 方法A
- 从T上和D建立链接并且配置转发端口p, 所有和T:p的数据交互都会转发到D:16021
- 在T上执行 ssh -L "*:5502:D:16021" x@D # 转发端口是5502
- -o ServerAliveInterval=60 # 我才想单位应该是s。这样每隔60s可以和server做一些keepalive的通信,确保长时间没有数据通信的情况下,连接不会断开。
- ssh -p 5502 x@T 或者 scp -P 5502 <file> x@T:<path-at-D>
- 方法B
- scp可以指定proxyCommand配合D上nc命令完成
- scp -o ProxyCommand="ssh -p 18021 y@T 'nc D 16021'" <file> x@D:<path-at-D>
UPDATE @ 2016-08-26: 发现这个方法可以用来解决remote ipython notebook的问题.
- 首先在目标机器dev上启动ipython notebook. `jupyter notebook –no-browser –port=8888`
- 然后在本机上选择绑定端口比如1000. `ssh -L "*:10000:dev:8888" dev`
之后就可以在本地使用 `http://localhost:10000` 来访问远端的notebook了.
11. 修改最大打开文件句柄数
- http://blog.csdn.net/superchanon/article/details/13303705
- http://unix.stackexchange.com/questions/127777/how-to-configure-the-process-open-file-limit-of-a-user
- https://www.kernel.org/doc/Documentation/sysctl/fs.txt
首先需要修改系统上限,这些可以在/etc/sysctl.conf里面修改,然后执行sysctl -p
- /proc/sys/fs/file-max # 所有进程打开文件句柄数上限
- /proc/sys/fs/nr_open # 单个进程打开文件句柄数上限
- /proc/sys/fs/file-nr # 系统当前打开文件句柄数
然后修改用户(进程)使用上限
- /etc/security/limits.conf
- ulimit
12. apt-get hang
在使用ubuntu的apt-get时候,可能会出现一些异常的状况,我们直接终止了apt-get。但是这个时候apt-get软件本身出于一个不正常的状态,导致之后不能够启动apt-get。如果观察进程的话会出现下面一些可疑的进程
dp@dp1:~$ ps aux | grep "apt"
root      3587  0.0  0.0  36148 22800 ?        Ds   Oct08   0:00 /usr/bin/dpkg --status-fd 50 --unpack --auto-deconfigure /var/cache/apt/archives/sgml-data_2.0.4_all.deb
root      9579  0.0  0.0  35992 22744 ?        Ds   Oct19   0:00 /usr/bin/dpkg --status-fd 50 --unpack --auto-deconfigure /var/cache/apt/archives/iftop_0.17-16_amd64.deb
root     25957  0.0  0.0  36120 22796 ?        Ds   Nov05   0:00 /usr/bin/dpkg --status-fd 50 --unpack --auto-deconfigure /var/cache/apt/archives/iftop_0.17-16_amd64.deb /var/cache/apt/archives/iotop_0.4-1_all.deb
dp       30586  0.0  0.0   7628  1020 pts/2    S+   08:59   0:00 grep --color=auto apt
这些进程的父进程都是init进程,并且状态是uninterruptible sleep,给kill -9也没有办法终止,唯一的办法只能reboot机器来解决这个问题。关于这个问题可以看stackoverflow上面的解答 How to stop 'uninterruptible' process on Linux? - Stack Overflow http://stackoverflow.com/questions/767551/how-to-stop-uninterruptible-process-on-linux
- Simple answer: you cannot. Longer answer: the uninterruptable sleep means the process will not be woken up by signals. It can be only woken up by what it's waiting for. When I get such situations eg. with CD-ROM, I usually reset the computer by using suspend-to-disk and resuming.
- The D state basically means that the process is waiting for disk I/O, or other block I/O that can't be interrupted. Sometimes this means the kernel or device is feverishly trying to read a bad block (especially from an optical disk). Sometimes it means there's something else. The process cannot be killed until it gets out of the D state. Find out what it is waiting for and fix that. The easy way is to reboot. Sometimes removing the disk in question helps, but that can be rather dangerous: unfixable catastrophic hardware failure if you don't know what you're doing (read: smoke coming out).
13. syslog on cpu
13.1. Core power limit notifaction
May 12 12:29:12 dp57 kernel: CPU1: Core power limit notification (total events = 42322)
May 12 12:29:12 dp57 kernel: CPU17: Core power limit notification (total events = 42321)
May 12 12:29:12 dp57 kernel: CPU5: Core power limit notification (total events = 42328)
May 12 12:29:12 dp57 kernel: CPU21: Core power limit notification (total events = 42327)
May 12 12:29:12 dp57 kernel: CPU19: Core power limit notification (total events = 42327)
May 12 12:29:12 dp57 kernel: CPU3: Core power limit notification (total events = 42327)
May 12 12:29:12 dp57 kernel: CPU7: Core power limit notification (total events = 42323)
May 12 12:29:12 dp57 kernel: CPU23: Core power limit notification (total events = 42322)
May 12 12:29:12 dp57 kernel: CPU25: Core power limit notification (total events = 42226)
May 12 12:29:12 dp57 kernel: CPU9: Core power limit notification (total events = 42222)
May 12 12:29:12 dp57 kernel: CPU11: Core power limit notification (total events = 42222)
May 12 12:29:12 dp57 kernel: CPU27: Core power limit notification (total events = 42219)
May 12 12:29:12 dp57 kernel: CPU13: Core power limit notification (total events = 42321)
May 12 12:29:12 dp57 kernel: CPU29: Core power limit notification (total events = 42307)
May 12 12:29:12 dp57 kernel: CPU15: Core power limit notification (total events = 42556)
May 12 12:29:12 dp57 kernel: CPU31: Core power limit notification (total events = 42550)
13.2. Package power limit notification
May 12 12:29:12 dp57 kernel: CPU17: Package power limit notification (total events = 42377)
May 12 12:29:12 dp57 kernel: CPU5: Package power limit notification (total events = 42612)
May 12 12:29:12 dp57 kernel: CPU21: Package power limit notification (total events = 42615)
May 12 12:29:12 dp57 kernel: CPU19: Package power limit notification (total events = 42553)
May 12 12:29:12 dp57 kernel: CPU3: Package power limit notification (total events = 42543)
May 12 12:29:12 dp57 kernel: CPU7: Package power limit notification (total events = 42661)
May 12 12:29:12 dp57 kernel: CPU23: Package power limit notification (total events = 42667)
May 12 12:29:12 dp57 kernel: CPU25: Package power limit notification (total events = 42707)
May 12 12:29:12 dp57 kernel: CPU9: Package power limit notification (total events = 42706)
May 12 12:29:12 dp57 kernel: CPU11: Package power limit notification (total events = 42705)
May 12 12:29:12 dp57 kernel: CPU27: Package power limit notification (total events = 42731)
May 12 12:29:12 dp57 kernel: CPU13: Package power limit notification (total events = 42619)
May 12 12:29:12 dp57 kernel: CPU29: Package power limit notification (total events = 42627)
May 12 12:29:12 dp57 kernel: CPU15: Package power limit notification (total events = 42623)
May 12 12:29:12 dp57 kernel: CPU31: Package power limit notification (total events = 42644)
May 12 12:29:12 dp57 kernel: CPU1: Package power limit notification (total events = 42360
13.3. below trip temperature. Throttling disabled
May 12 12:29:40 dp57 mcelog: Processor 17 below trip temperature. Throttling disabled
May 12 12:29:40 dp57 mcelog: Processor 5 below trip temperature. Throttling disabled
May 12 12:29:40 dp57 mcelog: Processor 21 below trip temperature. Throttling disabled
May 12 12:29:40 dp57 mcelog: Processor 19 below trip temperature. Throttling disabled
May 12 12:29:40 dp57 mcelog: Processor 3 below trip temperature. Throttling disabled
May 12 12:29:40 dp57 mcelog: Processor 7 below trip temperature. Throttling disabled
May 12 12:29:40 dp57 mcelog: Processor 23 below trip temperature. Throttling disabled
May 12 12:29:40 dp57 mcelog: Processor 25 below trip temperature. Throttling disabled
May 12 12:29:40 dp57 mcelog: Processor 9 below trip temperature. Throttling disabled
May 12 12:29:40 dp57 mcelog: Processor 11 below trip temperature. Throttling disabled
May 12 12:29:40 dp57 mcelog: Processor 27 below trip temperature. Throttling disabled
May 12 12:29:40 dp57 mcelog: Processor 13 below trip temperature. Throttling disabled
May 12 12:29:40 dp57 mcelog: Processor 29 below trip temperature. Throttling disabled
May 12 12:29:40 dp57 mcelog: Processor 15 below trip temperature. Throttling disabled
May 12 12:29:40 dp57 mcelog: Processor 17 below trip temperature. Throttling disabled
May 12 12:29:40 dp57 mcelog: Processor 31 below trip temperature. Throttling disabled
May 12 12:29:40 dp57 mcelog: Processor 5 below trip temperature. Throttling disabled
May 12 12:29:40 dp57 mcelog: Processor 21 below trip temperature. Throttling disabled
May 12 12:29:40 dp57 mcelog: Processor 19 below trip temperature. Throttling disabled
May 12 12:29:40 dp57 mcelog: Processor 3 below trip temperature. Throttling disabled
May 12 12:29:40 dp57 mcelog: Processor 7 below trip temperature. Throttling disabled
May 12 12:29:40 dp57 mcelog: Processor 23 below trip temperature. Throttling disabled
May 12 12:29:40 dp57 mcelog: Processor 25 below trip temperature. Throttling disabled
May 12 12:29:40 dp57 mcelog: Processor 9 below trip temperature. Throttling disabled
May 12 12:29:40 dp57 mcelog: Processor 11 below trip temperature. Throttling disabled
May 12 12:29:40 dp57 mcelog: Processor 27 below trip temperature. Throttling disabled
May 12 12:29:40 dp57 mcelog: Processor 13 below trip temperature. Throttling disabled
May 12 12:29:40 dp57 mcelog: Processor 29 below trip temperature. Throttling disabled
May 12 12:29:40 dp57 mcelog: Processor 15 below trip temperature. Throttling disabled
May 12 12:29:40 dp57 mcelog: Processor 31 below trip temperature. Throttling disabled
May 12 12:29:40 dp57 mcelog: Processor 1 below trip temperature. Throttling disabled
May 12 12:29:40 dp57 mcelog: Processor 1 below trip temperature. Throttling disabled
14. ssh access denied
通常来说access denied主要是因为 ~/.ssh/authorized_keys 里面没有配置公钥,但是也有其他原因比如目录权限等。 在排除了公钥问题之后如何定位access denied的原因呢?假如你现在还有一个session连接在远端服务器上的话,那么可以在 这个服务器上另外一个端口启动sshd, 并且开启debug模式来观察错误日志. (方法来自于这个 帖子)
下面我做个试验. 我先把 tinycache 的.ssh目录修改一下权限 `chmod og+rwx .ssh`
这个时候如果如果连接 tinycache 服务器就会出现下面错误
[ec2-user@rel0 ~]$ ssh tinycache
Permission denied (publickey).
然后我在 tinycache 服务器上启动debug模式的sshd
/usr/sbin/sshd -d -p 2222
然后重启尝试连接端口2222的话,那么这边就会出现错误日志
Authentication refused: bad ownership or modes for directory /home/ec2-user/.ssh
Authentication refused: bad ownership or modes for directory /home/ec2-user/.ssh
Authentication refused: bad ownership or modes for directory /home/ec2-user/.ssh