How to receive a million packets per second
https://blog.cloudflare.com/how-to-receive-a-million-packets/
注: 这个调优过程非常有学习意义
On Linux, how hard is it to write a program that receives 1 million UDP packets per second? (问题是要做到每秒接收1M UDP packets有多困难)
- Measuring packets per second (pps) is much more interesting than measuring bytes per second (Bps). You can achieve high Bps by better pipelining and sending longer packets. Improving pps is much harder.(使用pps而非Bps来做衡量指标,因为可以很容易通过增加packet size来提高Bps)
- Since we're interested in pps, our experiments will use short UDP messages. To be precise: 32 bytes of UDP payload. That means 74 bytes on the Ethernet layer.(所以我们也固定packet size = 32)
- For the experiments we will use two physical servers: "receiver" and "sender".(两台不同物理机器)
- They both have two six core 2GHz Xeon processors. With hyperthreading (HT) enabled that counts to 24 processors on each box. The boxes have a multi-queue 10G network card by Solarflare, with 11 receive queues configured. More on that later.(NetworkIO称为bottleneck之前,瓶颈肯定是在CPU上。2 * 6cores * 2HT = 24 processors. 多队列万兆网卡,配置11个接收队列)
- The source code of the test programs is available here: udpsender, udpreceiver.
在实验之前,先配置好iptables,以及在receiver机器上分配了20个IP。packets使用batch方式发送, batch size = 1024.
The naive approach
baseline没有任何额外设置
sender$ ./udpsender 192.168.254.1:4321
receiver$ ./udpreceiver1 0.0.0.0:4321
  0.352M pps  10.730MiB /  90.010Mb
  0.284M pps   8.655MiB /  72.603Mb
  0.262M pps   7.991MiB /  67.033Mb
  0.199M pps   6.081MiB /  51.013Mb
  0.195M pps   5.956MiB /  49.966Mb
  0.199M pps   6.060MiB /  50.836Mb
  0.200M pps   6.097MiB /  51.147Mb
  0.197M pps   6.021MiB /  50.509Mb
可以看到pps在195k~352k之间浮动,这是因为进程每次调度被分配到不同的core上运行,使用taskset -c来绑定运行core. 这样可以充分利用cache locality.
sender$ taskset -c 1 ./udpsender 192.168.254.1:4321
receiver$ taskset -c 1 ./udpreceiver1 0.0.0.0:4321
  0.362M pps  11.058MiB /  92.760Mb
  0.374M pps  11.411MiB /  95.723Mb
  0.369M pps  11.252MiB /  94.389Mb
  0.370M pps  11.289MiB /  94.696Mb
  0.365M pps  11.152MiB /  93.552Mb
  0.360M pps  10.971MiB /  92.033Mb
Send more packets
通过两个线程来提供发送pps, 但是可以看到接收pps并没有增长
sender$ taskset -c 1,2 ./udpsender \
            192.168.254.1:4321 192.168.254.1:4321
receiver$ taskset -c 1 ./udpreceiver1 0.0.0.0:4321
  0.349M pps  10.651MiB /  89.343Mb
  0.354M pps  10.815MiB /  90.724Mb
  0.354M pps  10.806MiB /  90.646Mb
  0.354M pps  10.811MiB /  90.690Mb
可以通过ethtool -S查看网口上统计数据. 这个网口有11个接受队列
receiver$ watch 'sudo ethtool -S eth2 |grep rx'
     rx_nodesc_drop_cnt:    451.3k/s
     rx-0.rx_packets:     8.0/s
     rx-1.rx_packets:     0.0/s
     rx-2.rx_packets:     0.0/s
     rx-3.rx_packets:     0.5/s
     rx-4.rx_packets:  355.2k/s
     rx-5.rx_packets:     0.0/s
     rx-6.rx_packets:     0.0/s
     rx-7.rx_packets:     0.5/s
     rx-8.rx_packets:     0.0/s
     rx-9.rx_packets:     0.0/s
     rx-10.rx_packets:    0.0/s
pps中有451k没有被kernel处理而丢弃,355.2k都是在rx-4接收队列上。通常一个接收队列只由一个特定processor来处理中断,所以这个时候会看到某个processor使用率特别高(cs应该也非常高)
所以我们做的是让packet能够尽可能地均匀地落在每个rx queue上,这样就不会让某个processor成为bottleneck.
Crash course to multi-queue NICs
Historically, network cards had a single RX queue that was used to pass packets between hardware and kernel. This design had an obvious limitation - it was impossible to deliver more packets than a single CPU could handle. To utilize multicore systems, NICs began to support multiple RX queues. The design is simple: each RX queue is pinned to a separate CPU, therefore, by delivering packets to all the RX queues a NIC can utilize all CPUs.
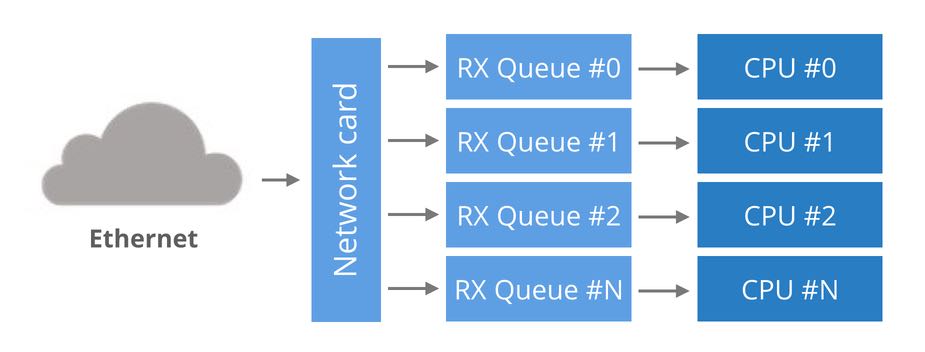
如何让packet均匀地落在rx-queue上?使用packet-base-round-robin是不可行的,因为这样会造成一个链接上多个packets之间顺序错乱。最好的方式当然是用(src-ip, src-port, dst-ip, dst-port)做hash然后取模。
配置网卡这个hash规则我们同样可以使用ethtool这个工具:ethtool -N eth0 rx-flow-hash udp4 sdfn
A note on NUMA performance
现在场景还是one rx-queue to one cpu. 来看看NUMA造成的性能差异。
- Run receiver on another CPU, but on the same NUMA node as the RX queue. The performance as we saw above is around 360kpps.(同一个NUMA node但是另一块CPU,不同CPU Cache, pps = 360k)
- With receiver on exactly same CPU as the RX queue we can get up to ~430kpps. But it creates high variability. The performance drops down to zero if the NIC is overwhelmed with packets.(同一块CPU,应该是相同core, pps = 430k)
- When the receiver runs on the HT counterpart of the CPU handling RX queue, the performance is half the usual number at around 200kpps.(同一个core但是不同HT,性能减半, pps = 200k)
- With receiver on a CPU on a different NUMA node than the RX queue we get ~330k pps. The numbers aren't too consistent though.(不同NUMA node,pps = 330k)
While a 10% penalty for running on a different NUMA node may not sound too bad, the problem only gets worse with scale. On some tests I was able to squeeze out only 250kpps per core. On all the cross-NUMA tests the variability was bad. The performance penalty across NUMA nodes is even more visible at higher throughput. In one of the tests I got a 4x penalty when running the receiver on a bad NUMA node.(如果只是上面10%影响的话那么还不算太坏,但是cross-NUMA tests偏差波动会非常大,甚至有有时可以降低75%)
— Multiple receive IPs
除了使用多队列的方式外,我们还可以使用多IP来避免单个processor来处理中断。
sender$ taskset -c 1,2 ./udpsender 192.168.254.1:4321 192.168.254.2:4321
receiver$ watch 'sudo ethtool -S eth2 |grep rx'
     rx-0.rx_packets:     8.0/s
     rx-1.rx_packets:     0.0/s
     rx-2.rx_packets:     0.0/s
     rx-3.rx_packets:  355.2k/s
     rx-4.rx_packets:     0.5/s
     rx-5.rx_packets:  297.0k/s
     rx-6.rx_packets:     0.0/s
     rx-7.rx_packets:     0.5/s
     rx-8.rx_packets:     0.0/s
     rx-9.rx_packets:     0.0/s
     rx-10.rx_packets:    0.0/s
receiver$ taskset -c 1 ./udpreceiver1 0.0.0.0:4321
  0.609M pps  18.599MiB / 156.019Mb
  0.657M pps  20.039MiB / 168.102Mb
  0.649M pps  19.803MiB / 166.120Mb
我们绑定两个IP,性能就可以翻倍了。
如果我们继续增加发送IP数量的话,接收pps不再上升,rx_nodesc_drop_cnt也不增加。netstat能够看到接收错误
receiver$ watch 'netstat -s --udp'
Udp:
      437.0k/s packets received
        0.0/s packets to unknown port received.
      386.9k/s packet receive errors
        0.0/s packets sent
    RcvbufErrors:  123.8k/s
    SndbufErrors: 0
    InCsumErrors: 0
这意味着packet可以被投递到kernel, 但是kernel没有办法投递到application,application处理packet速度太慢(386.9k + 123.8k被丢弃)
Receive from many threads
为了提高application处理速度,就需要使用多线程来做处理。可是如果每个线程都从同一个fd读取的话,那么锁冲突的代价非常大反过来称为瓶颈。
可以使用 SO_REUSEPORT 来解决这个问题. SO_REUSEPORT允许多个进程/线程绑定同一个端口(不同fd)来读取写入数据(底层实现是根据<src-ip, src-port, dst-ip, dst-port>做hash放入不同的bucket, 上层fd会在不同bucket里面取出链接来处理。如果某个fd进程挂掉的话,那么这个bucket里面所有packets都会作废)
receiver$ taskset -c 1,2,3,4 ./udpreceiver1 0.0.0.0:4321 4 1
  1.114M pps  34.007MiB / 285.271Mb
  1.147M pps  34.990MiB / 293.518Mb
  1.126M pps  34.374MiB / 288.354Mb
Final words
To sum up, if you want a perfect performance you need to:
- Ensure traffic is distributed evenly across many RX queues and SO_REUSEPORT processes. In practice, the load usually is well distributed as long as there are a large number of connections (or flows).
- You need to have enough spare CPU capacity to actually pick up the packets from the kernel.
- To make the things harder, both RX queues and receiver processes should be on a single NUMA node.
While we had shown that it is technically possible to receive 1Mpps on a Linux machine, the application was not doing any actual processing of received packets - it didn't even look at the content of the traffic. Don't expect performance like that for any practical application without a lot more work.(注意这个实验里面没有对packet做任何处理)