Docker
Table of Contents
- https://www.docker.com/
- https://docs.docker.com/userguide/
- LXC https://linuxcontainers.org/
- AUFS http://en.wikipedia.org/wiki/Aufs
1. Introduction
docker允许将应用运行所需要的环境打包,这样可以很容易地对应用进行分发以及部署。
docker使用cs架构,所以即使在本地运行也需要启动一个daemon server进程 `sudo service docker [command]` 或者是 `sudo docker -d &`. 然后docker大部分使用方式都是集中在client上.
默认server使用unix:///var/run/docker.sock做通信,因为这个文件owner是root,所以所有docker命令必须以sudo开头。如果修改这个文件的owner为普通用户(或将自己加入docker组)的话就可以不用sudo开头。我们虽然可以在配置文件/etc/default/docker里面修改默认通信地址,但是这样的话所有docker命令都要添加-H来指定通讯方式,比较繁琐.
docker底层可以使用virtualbox(开销大,可以使用其他内核), 也可以使用lxc(轻量,必须使用本地内核). 如果使用lxc的话必须确保linux内核支持,使用下面命令来升级内核
#安装内核
sudo apt-get install linux-image-generic-lts-raring linux-headers-generic-lts-raring
#重启
sudo reboot
然后用apt-get命令来安装docker
sudo apt-key adv --keyserver keyserver.ubuntu.com --recv-keys 36A1D7869245C8950F966E92D8576A8BA88D21E9
sudo sh -c "echo deb http://get.docker.io/ubuntu docker main >/etc/apt/sources.list.d/docker.list"
sudo apt-get update
sudo apt-get install lxc lxc-docker
高版本docker不再使用lxc而是使用libcontainer作为默认容器格式
Container format. Docker combines these components into a wrapper we call a container format. The default container format is called libcontainer. Docker also supports traditional Linux containers using LXC. In the future, Docker may support other container formats, for example, by integrating with BSD Jails or Solaris Zones.
如果需要使用lxc作为container format的话必须修改配置文件/etc/default/docker.
DOCKER_OPTS="-e lxc"
2. Command
2.1. docker
下面是docker client所有命令。大部分命令都是自描述的。
➜  docker  docker
Usage: docker [OPTIONS] COMMAND [arg...]
-H=[unix:///var/run/docker.sock]: tcp://host:port to bind/connect to or unix://path/to/socket to use

A self-sufficient runtime for linux containers.

Commands:
    attach    Attach to a running container
    build     Build an image from a Dockerfile
    commit    Create a new image from a container's changes
    cp        Copy files/folders from a container's filesystem to the host path
    diff      Inspect changes on a container's filesystem
    events    Get real time events from the server
    export    Stream the contents of a container as a tar archive
    history   Show the history of an image
    images    List images
    import    Create a new filesystem image from the contents of a tarball
    info      Display system-wide information
    inspect   Return low-level information on a container
    kill      Kill a running container
    load      Load an image from a tar archive
    login     Register or log in to the Docker registry server
    logs      Fetch the logs of a container
    port      Lookup the public-facing port that is NAT-ed to PRIVATE_PORT
    pause     Pause all processes within a container
    ps        List containers
    pull      Pull an image or a repository from a Docker registry server
    push      Push an image or a repository to a Docker registry server
    restart   Restart a running container
    rm        Remove one or more containers
    rmi       Remove one or more images
    run       Run a command in a new container
    save      Save an image to a tar archive
    search    Search for an image on the Docker Hub
    start     Start a stopped container
    stop      Stop a running container
    tag       Tag an image into a repository
    top       Lookup the running processes of a container
    unpause   Unpause a paused container
    version   Show the Docker version information
    wait      Block until a container stops, then print its exit code
命令基本可以分为操作container和image两类。container可以通过ID, NAME来定位。image可以通过ID, REPOSITORY:TAG来定位。
➜  wsrep-5.6  sudo docker ps -a
[sudo] password for dirlt:
CONTAINER ID        IMAGE               COMMAND             CREATED             STATUS              PORTS               NAMES
84d4b4a3ad11        ubuntu:latest       /bin/bash           5 seconds ago       Up 5 seconds                            angry_nobel

➜  wsrep-5.6  sudo docker inspect 84d4b4a3ad11
[{
    "Args": [],
    "Config": {
        "AttachStderr": true,
        "AttachStdin": true,
        "AttachStdout": true,
        "Cmd": [
            "/bin/bash"
        ],
        "CpuShares": 0,
        "Cpuset": "",
        "Domainname": "",
        "Entrypoint": null,
        "Env": [
            "HOME=/",
            "PATH=/usr/local/sbin:/usr/local/bin:/usr/sbin:/usr/bin:/sbin:/bin"
        ],
......

➜  wsrep-5.6  sudo docker images
REPOSITORY          TAG                 IMAGE ID            CREATED             VIRTUAL SIZE
ubuntu              latest              c4ff7513909d        3 days ago          225.4 MB
对于reposiroty名称约定是<username>/<image>. 如果不指定TAG只指定REPO的话,根据上下文结果会是REPO的最新一个TAG,或者是REPO下所有TAG。
comments on some commands
- attach. 后台运行任务通常是非交互式的并且使用-d启动
- history. 查看image是如何创建的
- export/import. tarball里面文件都是single-layer所以可以用来创建全新的image.
- save/load. 导出和导入image.
- pull. 可以指定从远端什么地方拉取比如 sudo docker pull registry.hub.docker.com/fedora:20
- commit. 可以对container做snapshot,做成image方便后续使用
- top. 查看container进程列表
- tag. 为image指定名称
- inspect. 查看container/image配置信息
2.2. run
Run a process in a new container. docker run starts a process with its own file system, its own networking, and its own isolated process tree. The IMAGE which starts the process may define defaults related to the process that will be run in the container, the networking to expose, and more, but docker run gives final control to the operator or administrator who starts the container from the image. For that reason docker run has more options than any other Docker command. If the IMAGE is not already loaded then docker run will pull the IMAGE, and all image dependencies, from the repository in the same way running docker pull IMAGE, before it starts the container from that image. (用于启动容器。image本身可能已经包含了一些文件系统以及网络还有独立进程,但是用户也可以改写这些选项。如果image在本地不存在的话就会尝试从远端拉下来)
资源限制
- -c, –cpu-shares=0 CPU shares in relative weight.
- –cpuset="" CPUs in which to allow execution (0-3, 0,1)
- –lxc-conf=[] (lxc exec-driver only) Add custom lxc options –lxc-conf="lxc.cgroup.cpuset.cpus = 0,1"
- -m, –memory=memory-limit Allows you to constrain the memory available to a container.
容器管理
- -i, -interactive=true|false When set to true, keep stdin open even if not attached.
- -t, -tty=true|false When set to true Docker can allocate a pseudo-tty and attach to the standard input of any container.
- -a, –attach=stdin|stdout|stderr Attach to stdin, stdout or stderr.
- -d, –detach=true|false Detached mode.
- –cidfile=file Write the container ID to the file specified.
- -e, –env=environment Set environment variables.
- –env-file=[] Read in a line delimited file of ENV variables
- -h, –hostname=hostname Sets the container host name that is available inside the container.
- –name=name Assign a name to the container.
- –rm=true|false If set to true the container is automatically removed when it exits.
- –sig-proxy=true|false When set to true, proxify received signals to the process (even in non-tty mode).
- -u, –user=username,uid Set a username or UID for the container.
- –privileged=true|false Give extended privileges to this container.
- -v, –volume=volume[:ro|:rw] Bind mount a volume to the container. # -v <host-path>:<container-path>
- –volumes-from=container-id[:ro|:rw] Will mount volumes from the specified container identified by container-id.
- -w, –workdir=directory Working directory inside the container.
网络配置
- –dns-search=[] Set custom dns search domains.
- –dns=IP-address Set custom DNS servers.
- –entrypoint=command This option allows you to overwrite the default entrypoint of the image that is set in the Dockerfile.
- –expose=port Expose a port from the container without publishing it to your host.
- –link=name:alias Add link to another container.
- –net="bridge" Set the Network mode for the container.
- -P, –publish-all=true|false When set to true publish all exposed ports to the host interfaces. # 映射出所有暴露端口
- -p, –publish=[] Publish a container's port to the host # -p <host-port>:<container-port>
在foreground和background之间切换还是有点问题的(C-P以及C-Q都不work),http://stackoverflow.com/questions/20145717/how-to-detach-from-a-docker-container 所以个人觉得比较有效的方式就是:
- 交互式应用 # docker run -i -t –rm ubuntu /bin/bash
- 非交互式应用 # docker run -d ubuntu <cmd> 这里cmd可以是后台应用也可以是sshd
2.3. inspect
inspect可以看到container和image内部具体信息。下面是一个container inspection的输出
➜  ~  sudo docker inspect 22b
[{
    "Args": [],
    "Config": {
        "AttachStderr": true,
        "AttachStdin": true,
        "AttachStdout": true,
        "Cmd": [
            "/bin/bash"
        ],
        "CpuShares": 0,
        "Cpuset": "",
        "Domainname": "",
        "Entrypoint": null,
        "Env": [
            "HOME=/",
            "PATH=/usr/local/sbin:/usr/local/bin:/usr/sbin:/usr/bin:/sbin:/bin"
        ],
        "ExposedPorts": null,
        "Hostname": "22b078636c10",
        "Image": "ubuntu",
        "Memory": 0,
        "MemorySwap": 0,
        "NetworkDisabled": false,
        "OnBuild": null,
        "OpenStdin": true,
        "PortSpecs": null,
        "StdinOnce": true,
        "Tty": true,
        "User": "",
        "Volumes": null,
        "WorkingDir": ""
    },
    "Created": "2014-08-18T03:09:42.322264455Z",
    "Driver": "aufs",
    "ExecDriver": "native-0.2",
    "HostConfig": {
        "Binds": null,
        "ContainerIDFile": "",
        "Dns": null,
        "DnsSearch": null,
        "Links": null,
        "LxcConf": [],
        "NetworkMode": "bridge",
        "PortBindings": {},
        "Privileged": false,
        "PublishAllPorts": false,
        "VolumesFrom": null
    },
    "HostnamePath": "/var/lib/docker/containers/22b078636c10249d02359130197af40bb7f48d8321c09f1c5d8fe4349b8cafd4/hostname",
    "HostsPath": "/var/lib/docker/containers/22b078636c10249d02359130197af40bb7f48d8321c09f1c5d8fe4349b8cafd4/hosts",
    "Id": "22b078636c10249d02359130197af40bb7f48d8321c09f1c5d8fe4349b8cafd4",
    "Image": "c4ff7513909dedf4ddf3a450aea68cd817c42e698ebccf54755973576525c416",
    "MountLabel": "",
    "Name": "/naughty_curie",
    "NetworkSettings": {
        "Bridge": "",
        "Gateway": "",
        "IPAddress": "",
        "IPPrefixLen": 0,
        "PortMapping": null,
        "Ports": null
    },
    "Path": "/bin/bash",
    "ProcessLabel": "",
    "ResolvConfPath": "/var/lib/docker/containers/22b078636c10249d02359130197af40bb7f48d8321c09f1c5d8fe4349b8cafd4/resolv.conf",
    "State": {
        "ExitCode": 0,
        "FinishedAt": "2014-08-18T03:09:43.298188716Z",
        "Paused": false,
        "Pid": 0,
        "Running": false,
        "StartedAt": "2014-08-18T03:09:42.368868329Z"
    },
    "Volumes": {},
    "VolumesRW": {}
}
]
下面是一个image inspection的输出
➜  ~  sudo docker inspect c4f
[{
    "Architecture": "amd64",
    "Author": "",
    "Comment": "",
    "Config": {
        "AttachStderr": false,
        "AttachStdin": false,
        "AttachStdout": false,
        "Cmd": [
            "/bin/bash"
        ],
        "CpuShares": 0,
        "Cpuset": "",
        "Domainname": "",
        "Entrypoint": null,
        "Env": [
            "HOME=/",
            "PATH=/usr/local/sbin:/usr/local/bin:/usr/sbin:/usr/bin:/sbin:/bin"
        ],
        "ExposedPorts": null,
        "Hostname": "b756a5b3138f",
        "Image": "cc58e55aa5a53b572f3b9009eb07e50989553b95a1545a27dcec830939892dba",
        "Memory": 0,
        "MemorySwap": 0,
        "NetworkDisabled": false,
        "OnBuild": [],
        "OpenStdin": false,
        "PortSpecs": null,
        "StdinOnce": false,
        "Tty": false,
        "User": "",
        "Volumes": null,
        "WorkingDir": ""
    },
    "Container": "9171240b5812e222219401a43d291d652c9f67a52b03961d130202635bba0bed",
    "ContainerConfig": {
        "AttachStderr": false,
        "AttachStdin": false,
        "AttachStdout": false,
        "Cmd": [
            "/bin/sh",
            "-c",
            "#(nop) CMD [/bin/bash]"
        ],
        "CpuShares": 0,
        "Cpuset": "",
        "Domainname": "",
        "Entrypoint": null,
        "Env": [
            "HOME=/",
            "PATH=/usr/local/sbin:/usr/local/bin:/usr/sbin:/usr/bin:/sbin:/bin"
        ],
        "ExposedPorts": null,
        "Hostname": "b756a5b3138f",
        "Image": "cc58e55aa5a53b572f3b9009eb07e50989553b95a1545a27dcec830939892dba",
        "Memory": 0,
        "MemorySwap": 0,
        "NetworkDisabled": false,
        "OnBuild": [],
        "OpenStdin": false,
        "PortSpecs": null,
        "StdinOnce": false,
        "Tty": false,
        "User": "",
        "Volumes": null,
        "WorkingDir": ""
    },
    "Created": "2014-08-12T03:30:47.480340266Z",
    "DockerVersion": "1.1.2",
    "Id": "c4ff7513909dedf4ddf3a450aea68cd817c42e698ebccf54755973576525c416",
    "Os": "linux",
    "Parent": "cc58e55aa5a53b572f3b9009eb07e50989553b95a1545a27dcec830939892dba",
    "Size": 0
}
]
3. Data Container
- https://docs.docker.com/userguide/dockervolumes/
- https://medium.com/@ramangupta/why-docker-data-containers-are-good-589b3c6c749e
data-container相对直接mount本地目录作为data-volume这种方式有两个好处:1. 数据可以作为独立的container分发以及部署. 2 解决本地目录权限问题
➜  notes git:(master) ✗ dk run --name data-container -v /data-dir ubuntu:14.04 /bin/true
➜  notes git:(master) ✗ docker run --rm --volumes-from data-container ubuntu:14.04 sh -c "echo hello > /data-dir/hello"
➜  notes git:(master) ✗ docker run --rm --volumes-from data-container ubuntu:14.04 sh -c "cat /data-dir/hello"
hello
4. Dockerfile
使用Dockerfile可以很容易地构建image. 常用命令是docker build -t <image-name> .
Dockerfile格式很简单的:
# Comment
指令 参数
指令是不区分大小写的, 然而约定是大写的以便区分其他的参数。Docker会读测试Dockerfile中的指令,第一条命令必须是'FROM'来指定你正在构建的基本镜像。
常用指令有下面这些:
- FROM <image-name> # 基本镜像
- MAINTAINER <name> # 作者信息
- RUN <command> # 为构建image执行的shell命令
- CMD <command> # 基于这个image的容器入口指令
- EXPOSE <port> [<port>…] # 暴露外部端口
- ENV <key> <value> # 环境变量,影响之后的RUN
- ADD <src> <dest> # 添加hostOS文件,权限是755,uid=0.
- ENTRYPOINT <command> # see CMD
- VOLUME # 挂载本地或者是其他container文件系统(just placeholder) http://stackoverflow.com/questions/18873474/can-i-specify-host-directory-to-mount-from-dockerfile
- USER # 设置运行用户名和uid,影响之后的RUN
- WORKDIR # 设置工作目录,影响之后的RUN,CMD,ENTRYPOINT
5. Understanding Docker
https://docs.docker.com/introduction/understanding-docker/
some images from "docker 原理簡介" http://blog.blackwhite.tw/2013/12/docker.html
Docker has two major components:
- Docker: the open source container virtualization platform.
- Docker Hub: our Software-as-a-Service platform for sharing and managing Docker containers.
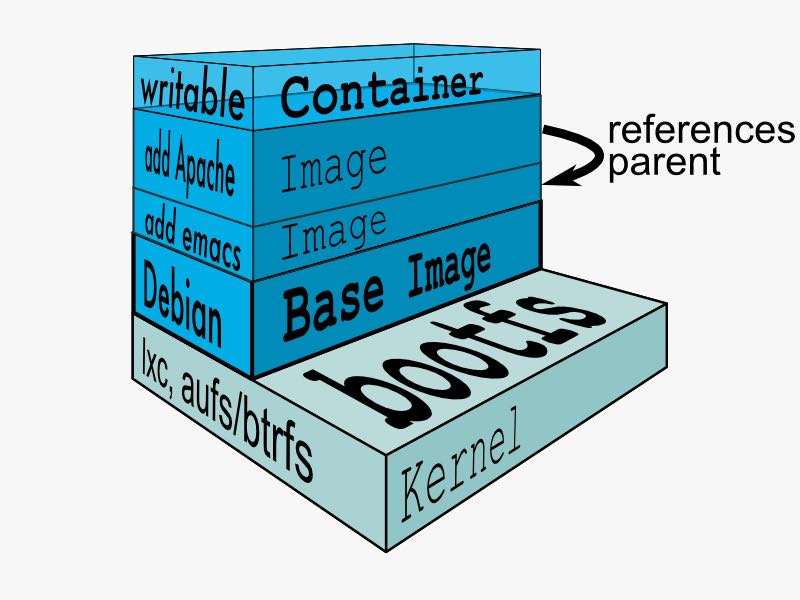
下面是docker架构图

To understand Docker's internals, you need to know about three components:
- Docker images. A Docker image is a read-only template. For example, an image could contain an Ubuntu operating system with Apache and your web application installed. Images are used to create Docker containers. Docker provides a simple way to build new images or update existing images, or you can download Docker images that other people have already created. Docker images are the build component of Docker.(应用执行所需环境的镜像,通常镜像是经过压缩的所以体积非常小)
- Docker registries. Docker registries hold images. These are public or private stores from which you upload or download images. The public Docker registry is called Docker Hub. It provides a huge collection of existing images for your use. These can be images you create yourself or you can use images that others have previously created. Docker registries are the distribution component of Docker.
- Docker containers. Docker containers are similar to a directory. A Docker container holds everything that is needed for an application to run. Each container is created from a Docker image. Docker containers can be run, started, stopped, moved, and deleted. Each container is an isolated and secure application platform. Docker containers are the run component of Docker.(container就是应用执行所需环境,首先通过image创建出来一个完整的系统,然后允许在这个系统上安装应用程序以及读写文件。container最后可以打包成为image进行分发和部署)
How does a Docker Image work?
We've already seen that Docker images are read-only templates from which Docker containers are launched. Each image consists of a series of layers. Docker makes use of union file systems to combine these layers into a single image. Union file systems allow files and directories of separate file systems, known as branches, to be transparently overlaid, forming a single coherent file system.(文件系统使用UFS,可以挂载多个文件系统然后提供统一视角,展现出一个整合之后的文件系统)
One of the reasons Docker is so lightweight is because of these layers. When you change a Docker image—for example, update an application to a new version— a new layer gets built. Thus, rather than replacing the whole image or entirely rebuilding, as you may do with a virtual machine, only that layer is added or updated. Now you don't need to distribute a whole new image, just the update, making distributing Docker images faster and simpler. (这也就是为什么读写image非常快,并且创建image体积非常小的原因。因为所有读写都不会影响base image, 只是操作单独的文件系统分支(layer),同时在创建和发布新image时候只需要base image ID + diff即可。layer这个单词非常形象,这些image就是一层层layer叠加起来的)
Docker usually gets these base images from Docker Hub. Docker images are then built from these base images using a simple, descriptive set of steps we call instructions. Each instruction creates a new layer in our image. Instructions include actions like: 1)Run a command. 2)Add a file or directory. 3)Create an environment variable. 4) What process to run when launching a container from this image. These instructions are stored in a file called a Dockerfile. Docker reads this Dockerfile when you request a build of an image, executes the instructions, and returns a final image. (创建image步骤都可以在Dockerfile里面指定)
How does a container work?
A container consists of an operating system, user-added files, and meta-data. As we've seen, each container is built from an image. That image tells Docker what the container holds, what process to run when the container is launched, and a variety of other configuration data. The Docker image is read-only. When Docker runs a container from an image, it adds a read-write layer on top of the image (using a union file system as we saw earlier) in which your application can then run.(container包括操作系统,用户添加文件,以及元信息。创建container就是在image上面添加一层rw layer)
What happens when you run a container?
Either by using the docker binary or via the API, the Docker client tells the Docker daemon to run a container.
$ docker run -i -t ubuntu /bin/bash
Let's break down this command. The Docker client is launched using the docker binary with the run option telling it to launch a new container. The bare minimum the Docker client needs to tell the Docker daemon to run the container is:(至少需要指定image, 以及运行command)
- What Docker image to build the container from, here ubuntu, a base Ubuntu image;
- The command you want to run inside the container when it is launched, here /bin/bash, to start the Bash shell inside the new container.
So what happens under the hood when we run this command? In order, Docker does the following:
- Pulls the ubuntu image: Docker checks for the presence of the ubuntu image and, if it doesn't exist locally on the host, then Docker downloads it from Docker Hub. If the image already exists, then Docker uses it for the new container.
- Creates a new container: Once Docker has the image, it uses it to create a container.
- Allocates a filesystem and mounts a read-write layer: The container is created in the file system and a read-write layer is added to the image.
- Allocates a network / bridge interface: Creates a network interface that allows the Docker container to talk to the local host.(创建网络接口)
- Sets up an IP address: Finds and attaches an available IP address from a pool.(设置IP地址)
- Executes a process that you specify: Runs your application, and;
- Captures and provides application output: Connects and logs standard input, outputs and errors for you to see how your application is running.(观察日志)
The underlying technology
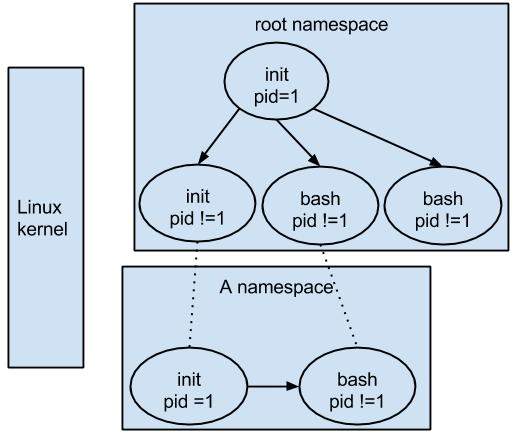
Namespaces(名字空间). Docker takes advantage of a technology called namespaces to provide the isolated workspace we call the container. When you run a container, Docker creates a set of namespaces for that container. This provides a layer of isolation: each aspect of a container runs in its own namespace and does not have access outside it. Some of the namespaces that Docker uses are:
- The pid namespace: Used for process isolation (PID: Process ID).
- The net namespace: Used for managing network interfaces (NET: Networking).
- The ipc namespace: Used for managing access to IPC resources (IPC: InterProcess Communication).
- The mnt namespace: Used for managing mount-points (MNT: Mount).
- The uts namespace: Used for isolating kernel and version identifiers. (UTS: Unix Timesharing System).
Control groups(资源控制). Docker also makes use of another technology called cgroups or control groups. A key to running applications in isolation is to have them only use the resources you want. This ensures containers are good multi-tenant citizens on a host. Control groups allow Docker to share available hardware resources to containers and, if required, set up limits and constraints. For example, limiting the memory available to a specific container.
Union file systems(UFS). Union file systems, or UnionFS, are file systems that operate by creating layers, making them very lightweight and fast. Docker uses union file systems to provide the building blocks for containers. Docker can make use of several union file system variants including: AUFS, btrfs, vfs, and DeviceMapper.
Container format. Docker combines these components into a wrapper we call a container format. The default container format is called libcontainer. Docker also supports traditional Linux containers using LXC. In the future, Docker may support other container formats, for example, by integrating with BSD Jails or Solaris Zones. #note: docker默认不再使用lxc而是libcontainer*
6. TroubleShooting
6.1. assign static ip to container
可以在启动container时候使用lxc-conf指定lxc配置来分配固定IP(必须保证容器格式是lxc)
有个工具可以简化这个步骤 https://github.com/jpetazzo/pipework
pipework br1 -i eth2 <container> 192.168.1.1/24
- create a bridge named br1 in the docker host;
- add an interface named eth2 to the container;
- assign IP address 192.168.1.1 to this interface,
- connect this interface to br1.
如果不使用pipework的话那么步骤如下
- sudo brctl addbr br1 # apt-get install bridge-utils
- (sudo brctl delbr br1)
- sudo ifconfig br1 inet 192.168.16.254 netmask 255.255.255.0
- (sudo ifconfig br1 down)
然后在docker启动时候添加如下参数
--lxc-conf="lxc.network.type=veth" \
--lxc-conf="lxc.network.name=eth1" \
--lxc-conf="lxc.network.flags=up" \
--lxc-conf="lxc.network.link=br1" \
--lxc-conf="lxc.network.ipv4=192.168.16.1/24" \